Mask for Photo: A Practical Guide to AI Headshots
You have a photo you almost like. The light is good, the smile is real, the shirt is wrong. So you open an editor, select the background, generate a replacement, and the result comes back with a clean new backdrop and hair that looks like someone trimmed it with pinking shears.
Nothing went wrong with the backdrop. Something went wrong at the edge.
Here's the direct version. A mask is the stencil that decides which pixels an edit is allowed to touch, and most disappointing AI headshots don't fail because the model is weak. They fail because the mask was drawn too loosely around the one thing viewers use to recognize you, or too tightly around the one thing they notice only when it's gone.
What a Photo Mask Is and Which Type You Need
Think of a mask as a stencil laid over the picture. One area is open and editable, everything else is covered and protected. In AI headshot work, the mask sets the region a single change may touch: a jacket, a backdrop, the hair color. Your face sits outside that region by design, which is exactly why the choice of mask type matters more than the choice of filter.
The diagram below maps the three roles a mask plays in that workflow.
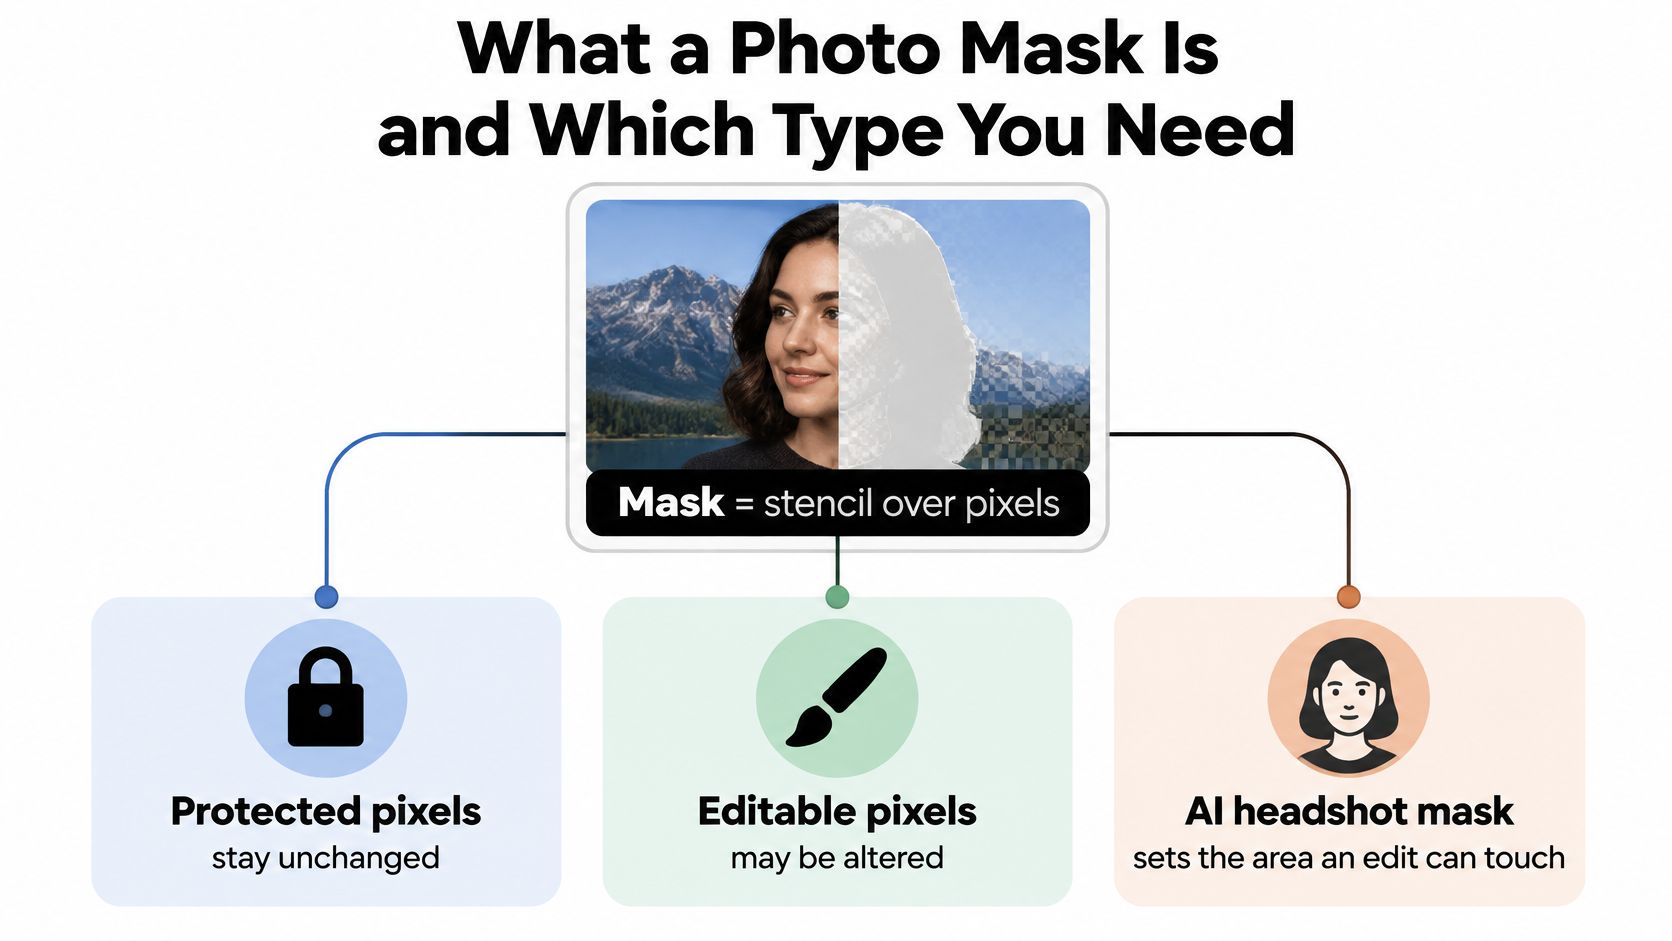
The distinction that decides quality comes from the image matting techniques reference from PicLab: binary segmentation assigns each pixel fully to foreground or background, while alpha matting estimates a continuous opacity value α between 0 and 1, so a pixel can be partly subject. Hair, glasses and translucent fabric need alpha. A binary mask cuts them out jaggedly or erases fine strands outright.
That same reference makes a point most tutorials skip: judge a mask at its boundaries, not by how much foreground it caught. Matting benchmarks use Sum of Absolute Differences, Mean Squared Error and Gradient Error, and gradient-sensitive measures are the ones that expose a blurred, broken or structurally wrong edge. On a portrait, that means inspecting hair strands, ears, shoulders, eyewear and collar lines at 100% zoom before you export anything.
Choose the mask type by what you're protecting, not by what you're changing.
Verander je professionele imago
Ontvang verbluffende AI-gegenereerde professionele headshots in minder dan een uur. Upload gewone selfies of groepsfoto's, kies uit meer dan 100 stijlen en wij maken honderden perfecte foto's die jouw beste ik weergeven.
Which Area to Mask for Each Headshot Edit
A sales director wants the navy blazer in her best frame to become charcoal for a LinkedIn set. The wrong move is to select the whole torso. The right move is to mask the jacket only, keep the face, neck and hair edges outside the mask, then zoom to 100% on the collar. That seam is where the fabrication shows, because the jacket meets skin and hair, and both carry more identity than the fabric ever will.
A background swap runs the same logic in reverse. You mask everything behind the subject and protect hair and shoulders deliberately, since those two carry most of the recognizability in a headshot. Skip that protection and you get a clean backdrop framed by a stranger's silhouette.
Lighting and expression edits behave differently again. Keep them small. A broad light mask shifts shadows across the entire face, and shadows are part of how a viewer confirms it's you. A tight mask around the eyes and mouth changes the mood without moving the architecture underneath.
A generative workflow pays for itself here. Apply one well-built mask across a reference set and a single decision covers ten variations, rather than a fresh session for every backdrop you want to try.
How to Mask a Headshot in Seven Steps
The order of these steps matters more than the tool you use, because each one protects the next. Run them in sequence and the first pass is usually the only pass.
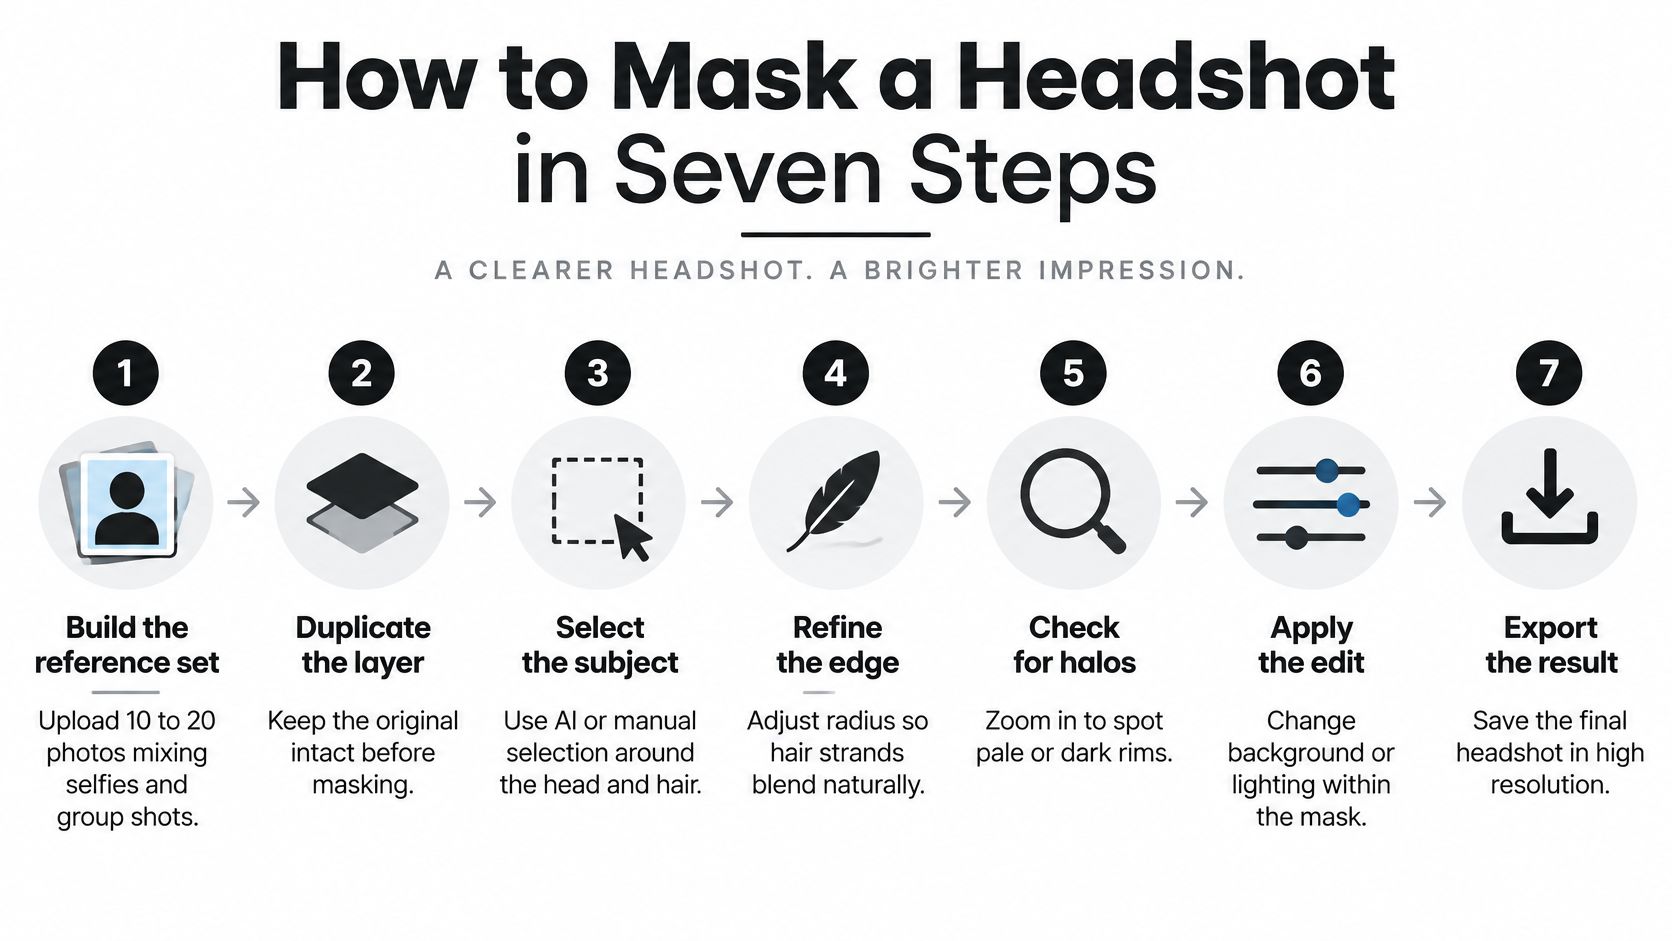
- Build the reference set. Upload 10 to 20 photos and select your gender, mixing well-lit selfies with group shots. Ordinary selfies and group photos both work as source material, and the variety gives later edits something to draw on. One frame can't supply different angles, and a mask behaves better when the source already matches the pose you want.
- Duplicate the layer before you mask. The original is your fallback. Any retouch you can't undo is a decision you can't revisit.
- Select the target area, then zoom to 100% on hair and shoulders. Errors surface there first, because that's where a boundary crosses fine detail.
- Refine the edge with alpha quality instead of a hard selection. Check the result on a light and a dark background. A mask that reads clean on grey can show a pale rim on white.
- Nudge the contract or expand control in small steps. Two clicks outward removes background spill. Ten clicks inward starts eating the collar.
- Apply the edit inside the mask only. New outfit, new color, new backdrop. If the change leaks past the selection, the mask is the problem, not the edit.
- Compare against the original at full size. If the face shifted or the hairline moved, shrink the mask and run the edit again.
The most common slip is skipping step three. It feels slow and it's the fastest thing you'll do all day, because a hair error caught at the selection stage costs seconds and the same error caught after export costs a redo. If you're still mapping which control does what, our walkthrough of editing generated images covers the order of operations from upload to final.
Fixing Hair, Glasses and Edge Defects
The defect you'll notice first is a pale or dark halo tracing the hair. That's rarely a model failure. It's a feather radius wide enough to fade hair pixels into a background they were never part of.
The sketch below shows where those boundaries sit on a portrait.
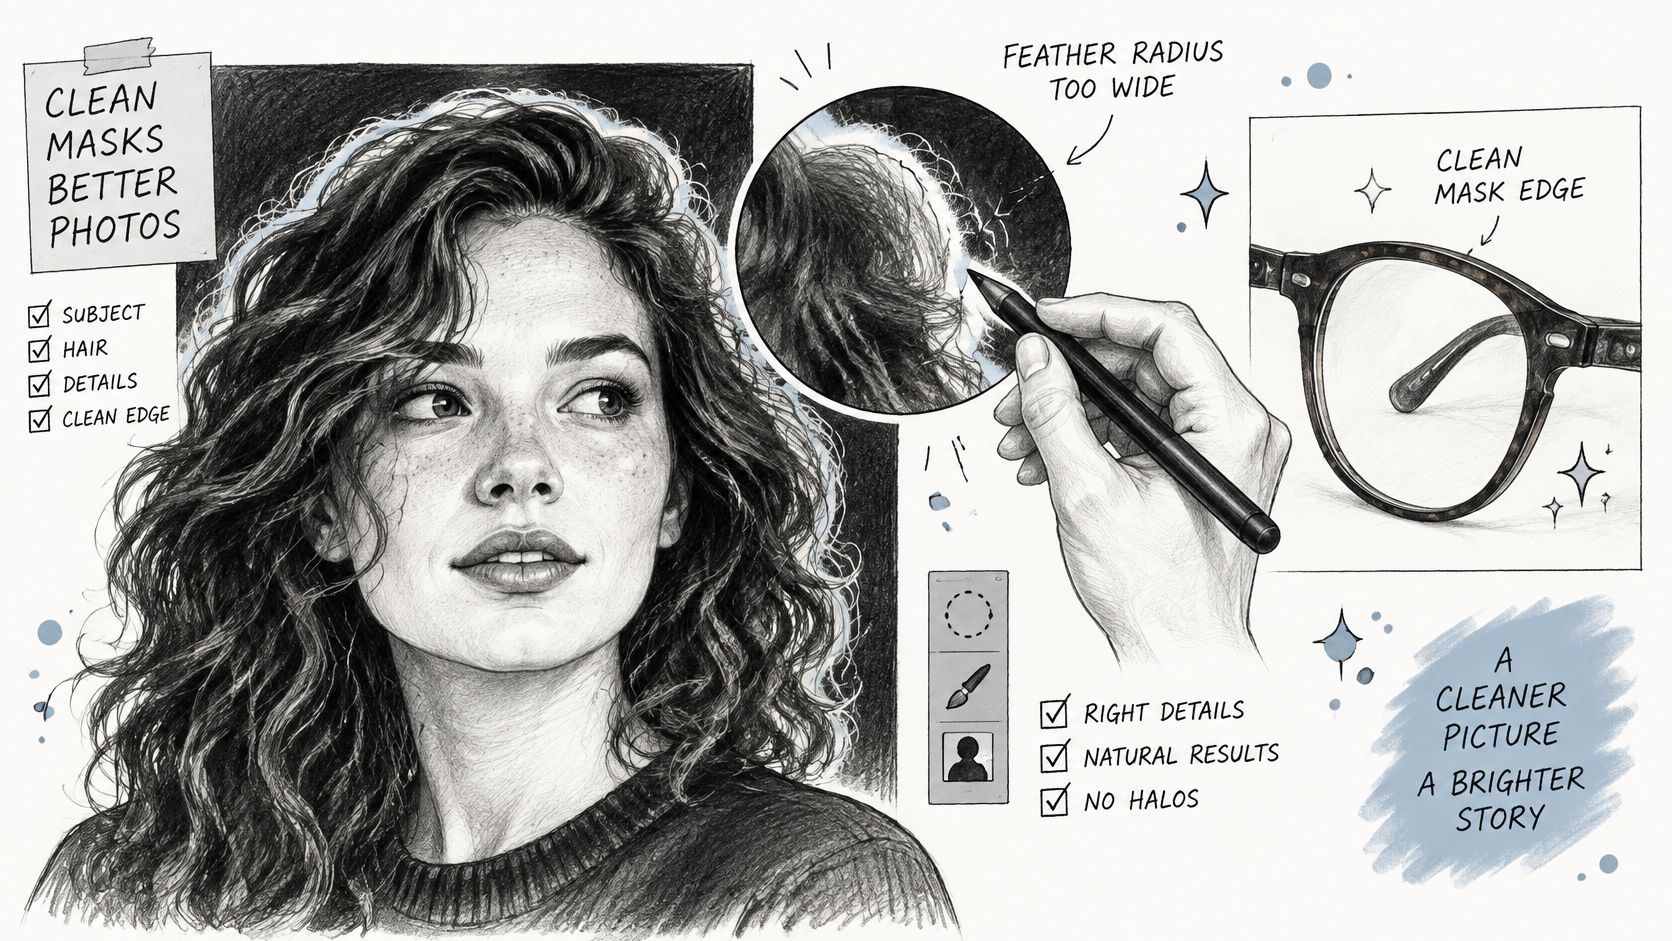
Edge work is really two separate jobs, and mixing them up causes most of what follows. The Adobe Photoshop guide to feathering edges separates them cleanly: anti-aliasing softens transitions only at boundary pixels and keeps sharpness, while feathering fades edge pixels gradually into their surroundings. Feather too far and hair, collars and facial contours blur, plus you inherit a halo the moment the subject lands on a contrasting background. The sequence that works is anti-aliasing during the initial selection, then the smallest feather radius that hides the hard edge at your output size, then a visual check on both light and dark backdrops. Adobe's masking controls also expand or contract a mask, which clears small background inclusions and stops a mask biting into the subject.
Glare belongs in the same pass, since a reflection smeared across a lens reads as a masking error to anyone who looks closely at the photo. Our guide to removing glare from a photo online free handles that one separately. Fix the edge once on the reference set and every later variation inherits a clean mask, which is where the time comes back.
Masking for Three Real Portrait Uses
Different jobs need different masks, and the pattern repeats across all of them. The demand is clearly there: the 2025 survey reported in the AI headshot market coverage from PetaPixel found that 44% of U.S. adults would consider using an AI-generated headshot, with Millennials showing the highest interest at 55%.
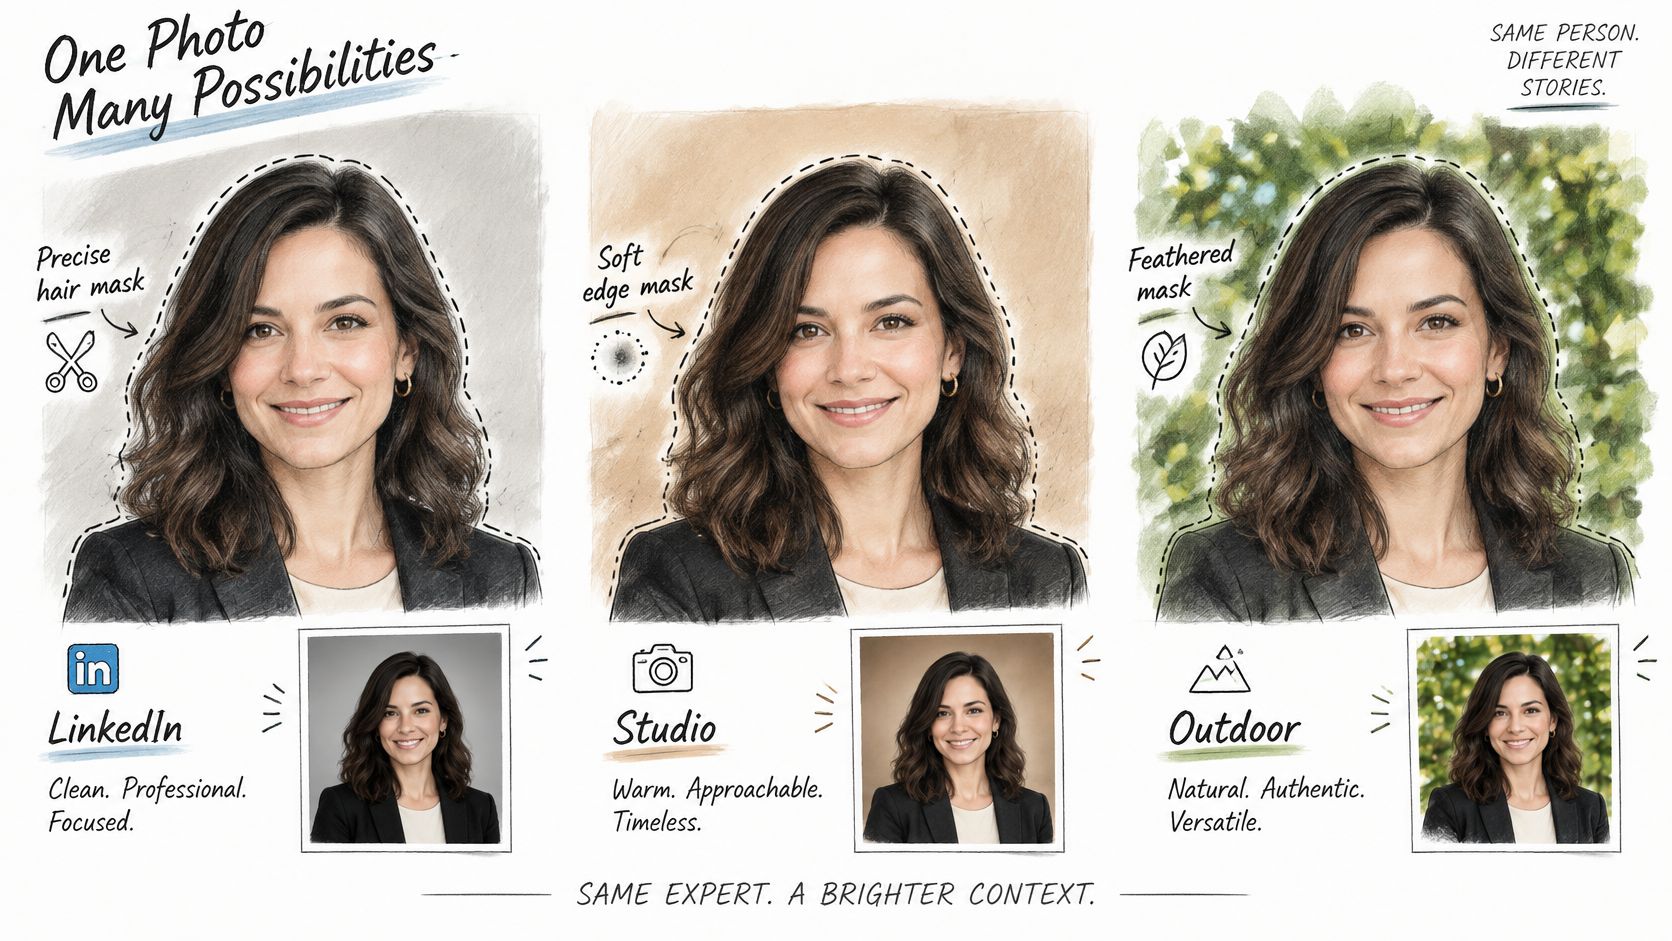
The consultant building three sets from one source. A neutral business backdrop for LinkedIn, a warmer expression for a personal website, a more creative style for social. The face and hair masks stay fixed across all three; only the backdrop mask changes. That's why the identity holds when someone clicks from her profile to her site.
The job seeker with no time for a studio. She masks background and outfit, nothing else, then checks the hairline at 100% before sending applications. Her constraint isn't taste, it's scheduling, and restricting the edit to two safe regions gets her a usable portrait the same afternoon.
The HR team standardizing a department. One shared mask template for backdrop and lighting means every employee portrait matches the company style without booking a room, a photographer and eleven calendars. Individual variation in someone's retouching habits stops leaking into the company page.
The benefit is identical in each case. One source set replaces repeated scheduling and styling, and the mask decides precisely which change happens, so nothing you didn't ask for gets altered.
Keeping Your Likeness Recognizable After Edits
An actor submits a portrait that's been smoothed and reshaped into something more polished. The director opens the self-tape and meets a different person. That mismatch takes seconds to spot, and it costs the role before the first line is read.
The assumption worth questioning is that a smoother portrait is a better one. Recognition runs on more than resolution. NIST's meta-analysis of face recognition covariates reports that performance depends on image quality, expression, resolution, age and the time between images. It also notes that poor lighting can disproportionately increase false negatives for darker-skinned subjects, so an edit that fixes one lighting problem can create another. In a larger NIST evaluation, false-positive rates varied by factors of 10 to more than 100 across demographic groups for some algorithms.
Rank your edits by that risk instead of by how much they flatter you.
- Low risk: background replacement and outfit changes. They leave facial geometry alone, so they're safe to apply broadly.
- Medium risk: hair color, glasses, light beauty adjustments. Compare these side by side with the original before you commit.
- High risk: skin smoothing and facial reshaping. These touch the exact features people use to place you, and they're the ones that break badges, verification and casting expectations.
High resolution won't rescue an identity mismatch, so the check has to happen by eye. Once a minimally edited reference passes that check, a generative workflow can spin new variations from it in minutes instead of booking another session.
Disclosure and Consent for Edited Portraits
Three separate questions get tangled together here. Does the image look realistic? Does it represent the person fairly? Should the audience be told how it was made? Answer them one at a time and the policy writes itself.
The evidence on the second and third is more interesting than expected. A preregistered study reported in Cyberpsychology research on AI-generated headshots found that AI-generated headshots were rated slightly higher in photo quality than comparable professional photos, but labeling them as AI-generated modestly reduced perceived quality. Disclosure did not reliably change impressions of the person's trustworthiness or attractiveness when identity was held constant. In plain terms, disclosure costs you polish, not credibility.
Where authenticity is expected, tell people. LinkedIn, recruiting, acting portfolios, real estate profiles and company-wide headshots all create expectation gaps when the retouching runs ahead of reality. A mask that keeps the person recognizable still needs an honest caption when the result is materially generated.
Consent is not a formality. Secta restricts headshot use in cases such as nude photos or photos of other people submitted without their consent, users must be at least 18 and of legal age in their jurisdiction, and uploaded data stays private and secured while photos are edited. The standard is documented permission. A medical weight loss photo gallery shows how sensitive before-and-after portraits become once they are public, so treat likeness publication as a signed decision rather than an assumption. Our model release forms guide covers the paperwork when you're publishing other people.
Write the standard once. It then applies to every portrait you generate, which is faster than reopening the argument each time someone new joins the team.
Start Your Next Headshot Edit Today
Pick the one edit you need. Mask the smallest area that completes it, protect the face and hair edges, and check the result at 100% on a light and a dark background before you export. That discipline keeps the person recognizable, which matters more than a dramatic retouch.
Secta Labs fits when you want the source work done once: upload your photos, receive hundreds of studio-grade portraits in under an hour, then edit generated images for clothing, expressions, backgrounds, hair and lighting. Its custom upscaler can raise resolution without damaging facial resemblance or overly smoothing the face, which helps after careful edge work.
If you already have an account, sign in to get a photoshoot style and continue from there.
Three first actions. Write down the single edit. Find its row in the area table above. Upload your reference photos, mask that one region properly, and label the portrait where authenticity is expected.