How to Edit Multiple Photos Faster with AI Tools
You've generated a promising set of AI portraits, but the results don't quite belong together. One face has a warm studio background, another looks slightly cool, a third has a crop that won't fit LinkedIn, and the retouching varies from natural to plastic. Editing each image from scratch is the slowest way to fix that.
The faster approach is to treat the portraits as a coordinated set. Establish a reference look, apply the decisions that should remain consistent, then let AI adapt exposure, crop, background, expression, and retouching to each individual image. That's the practical answer to how to edit multiple photos without turning every subject into the same artificial template.
Preparing and Organizing Your Photo Set
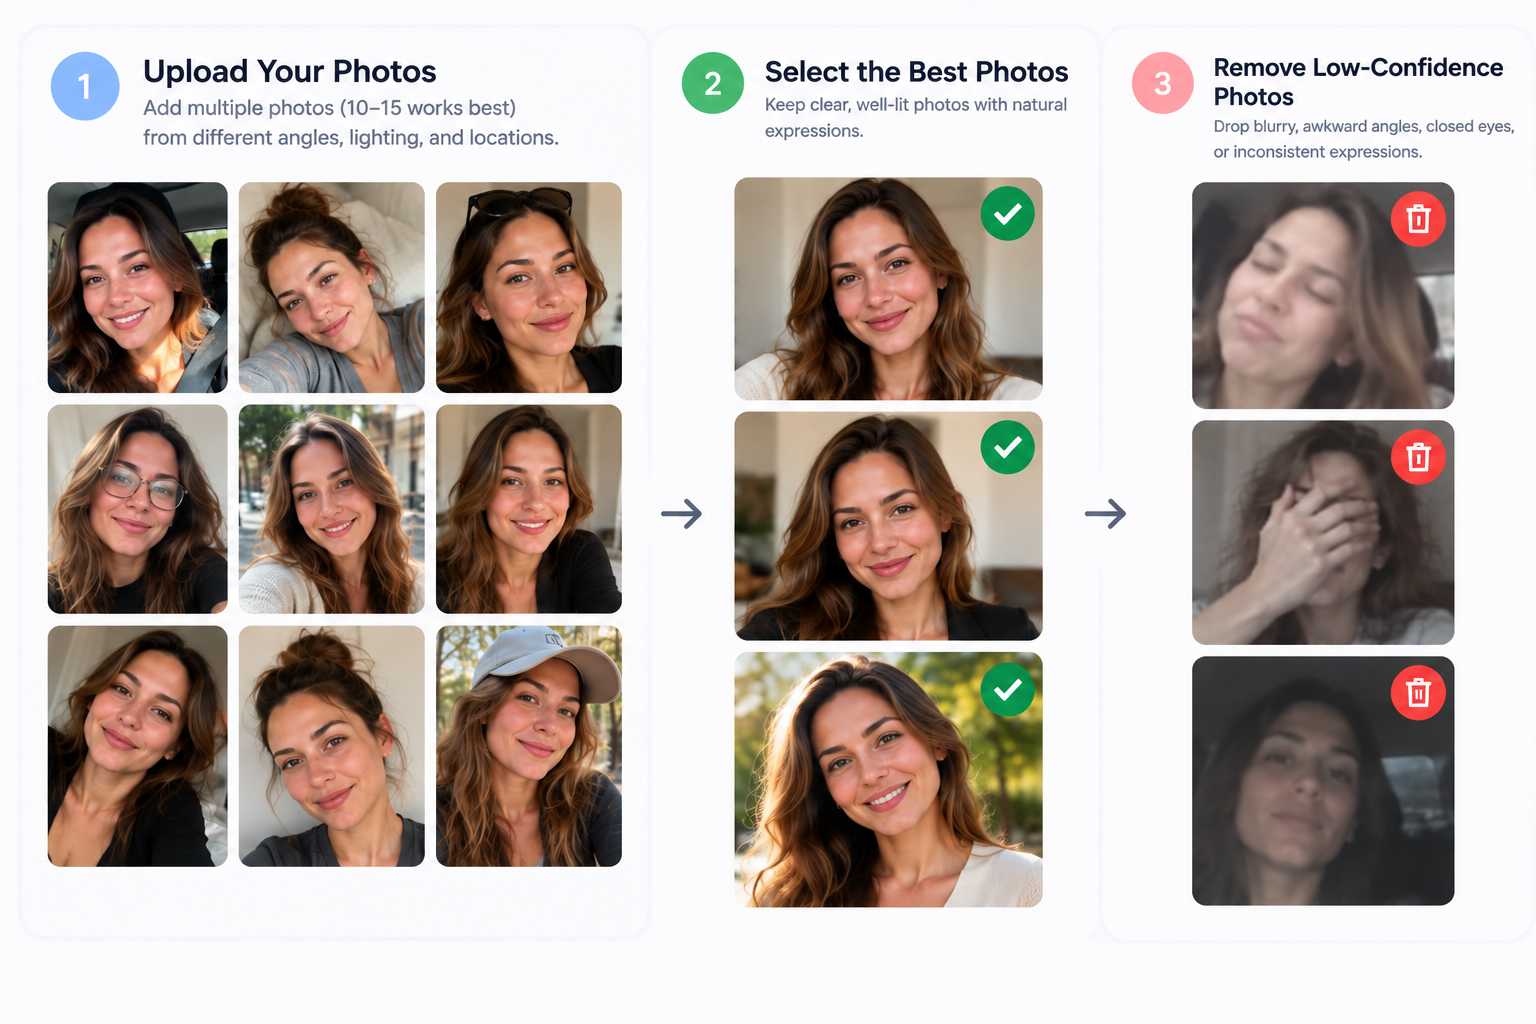
Start before you touch a slider. A clean source set makes every later decision faster, while a messy set forces you to repeat edits, undo bad syncs, and export files you never needed.
Separate the true source images from AI-generated portraits, enhanced versions, and upscaled copies. Keep the original uploads in a protected location, then create a working collection for generated candidates. This prevents an edited variant from accidentally becoming the new source for another generation or export.
Next, remove low-confidence picks. Drop portraits with awkward eyes, weak facial structure, unnatural hair, inconsistent hands, or expressions that don't suit the intended customer-facing use. Don't keep every image just because an AI tool produced it. A smaller, stronger set is easier to coordinate and gives customers more useful choices.
Use stars or flags to mark decisions instead of relying on folders. A folder can tell you where a file lives, but a flag can tell you why it survived. Mark portraits for specific purposes such as LinkedIn, a company team page, a conference badge, a portfolio, or an email signature.
Trasformate la vostra immagine professionale
Ottenete splendidi scatti professionali generati dall'intelligenza artificiale in meno di un'ora. Caricate normali selfie o foto di gruppo, scegliete tra oltre 100 stili e noi creeremo centinaia di scatti perfetti che rappresenteranno il vostro lato migliore.
Make the filenames work for you
Rename files with a session prefix and face identifier before batch editing. A naming pattern such as SpringProfile_FaceA_LinkedIn keeps sync and export operations from colliding, especially when several people have similar names or multiple variants share the same generated source.
Check the head crop, eye-line direction, and aspect ratio against the final destination before building a look. A portrait intended for a square profile image needs a different composition from one designed for a vertical professional profile. Re-cropping a finished batch creates unnecessary rework because it can change facial prominence, hair spacing, and background balance across the entire set.
For larger collections, a dedicated gallery management workflow helps keep sources, selections, and final candidates distinct. The point isn't elaborate file administration. It's making sure every later action applies to the right images.
Use this preflight checklist:
- Protect originals: Keep source files untouched and edit from copies or non-destructive versions.
- Check corrections: Apply the appropriate lens profile and profile corrections where they affect the source image.
- Confirm composition: Verify the head crop, gaze direction, and delivery ratio.
- Choose a reference: Select one representative frame with believable skin tone, balanced lighting, and the desired facial scale.
- Flag exceptions: Mark portraits with unusual lighting, hair, clothing, or background requirements before syncing anything.
That reference image will anchor the entire set. Choose a frame that represents the average quality of the collection, not the most dramatic portrait. A beautiful outlier can produce a poor batch look because its lighting and composition won't translate to everyone else.
Choosing and Building Presets and Reference Looks
There are two reliable ways to create a consistent portrait style. The first uses a conventional editor such as Lightroom Classic or Capture One. The second uses an AI headshot editor that understands a reference style and adapts it to each face.
With the classic route, perfect one representative portrait first. Set the tonal balance, skin color, contrast, background treatment, and finishing detail. Save those decisions as a preset, then test that preset on the worst-lit or least cooperative portrait in the set. If it only looks good on the hero image, it isn't a batch preset. Adobe documents how Lightroom Classic can copy settings to selected images, apply changes through Auto Sync, preserve edit history, and store named Snapshots, which supports a reversible workflow for groups of portraits in Adobe's guide to batch editing.
The AI route starts with a style reference rather than a rigid list of slider values. Provide representative portraits or a carefully written style prompt describing the background, lighting direction, wardrobe, mood, and level of retouching. The system can then coordinate the visual language while varying the treatment for each subject.
Compare the two approaches
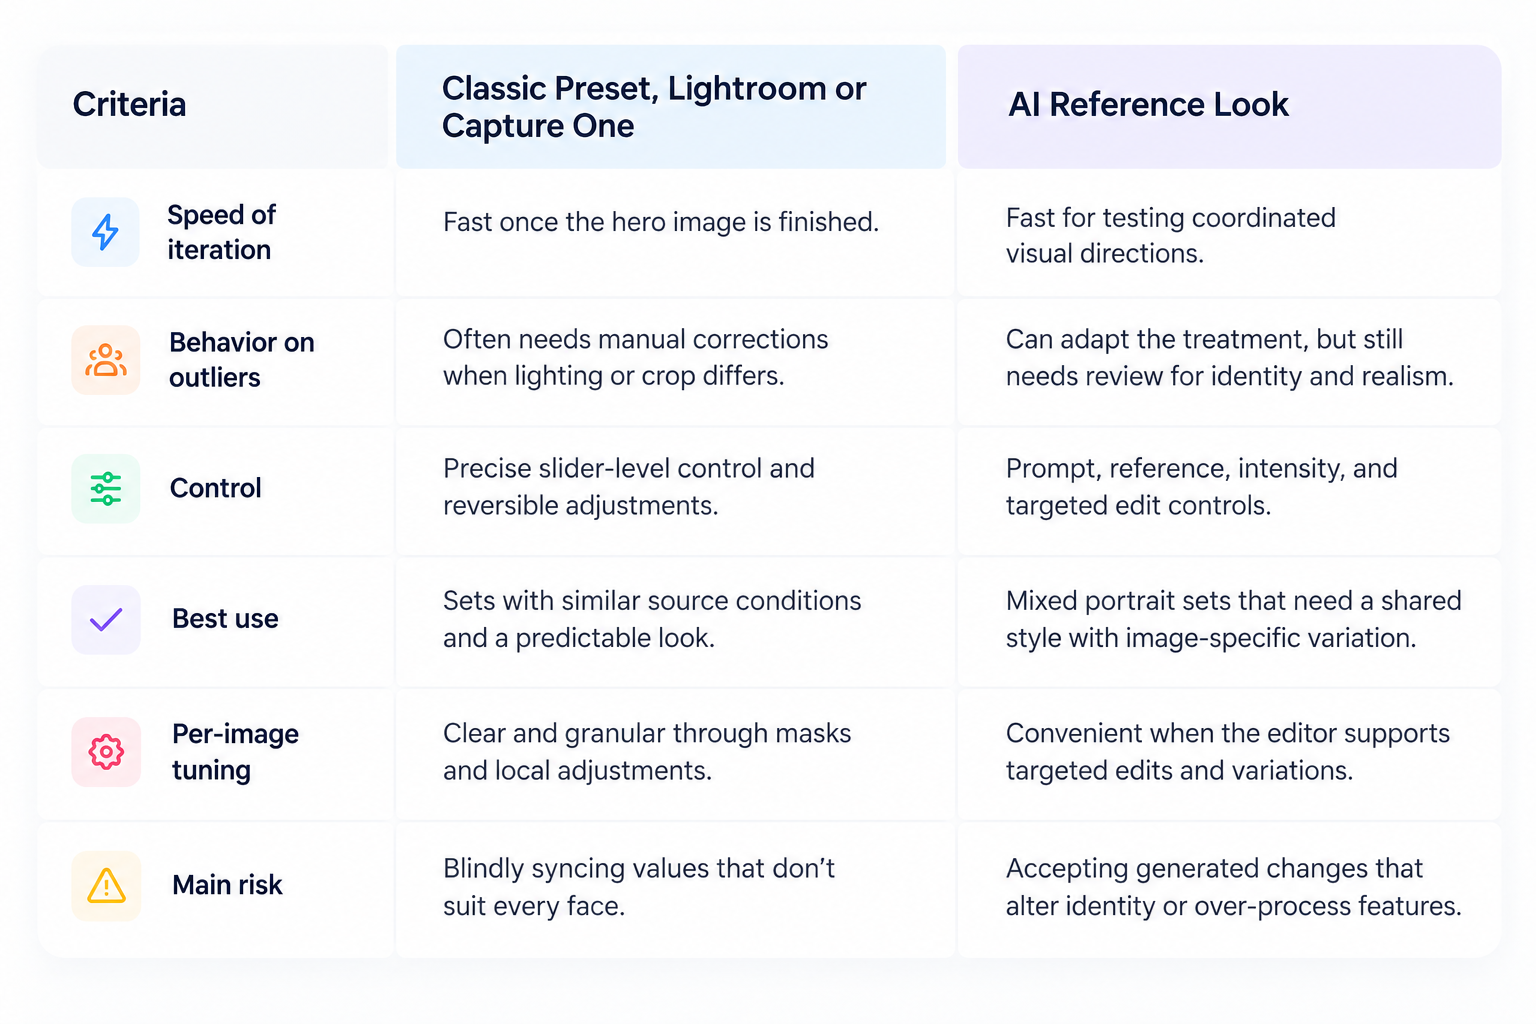
The practical choice is often hybrid. Use a conventional preset to establish technical consistency, then use AI for the work that varies by person, such as clothing, background, expression, crop, or facial cleanup. Adobe Firefly's professional headshot workflow uses a reference image and text prompt to define attire, background, lighting, and style, then lets users refine results with tools including Generative Fill and Remove. That makes it useful for testing portrait directions without rebuilding every image manually, as described in Firefly's professional headshot workflow.
Keep the preset library small. Three dependable looks, each tied to a clear scenario, are more useful than a sprawling collection you choose at random. Label them by the situation they fit, such as window-lit portrait, mixed office light, on-camera flash, or AI-rendered studio.
Running Batch Adjustments Across the Set
Batch editing works best when you apply decisions in a deliberate order. Don't follow the layout of the software's sliders. Follow the order that protects identity, skin tone, and composition.
Begin with global exposure and white balance. Make sure no portrait is clipped, muddy, or noticeably warmer than the reference. In a generated set, this may mean correcting the source images before applying a creative style. In a conventional editor, select the relevant images and paste or synchronize only the adjustments that belong at the global level. Adobe's Lightroom documentation describes both multi-selection pasting and Auto Sync, which explains why synchronized editing remains useful for high-volume portrait work in Adobe's batch-editing documentation.
Apply the chosen preset or AI reference look next. Don't retouch before the overall color and tonal direction is stable. Skin smoothing that looks acceptable on a neutral portrait can look excessive after contrast, warmth, or background changes.
Sync the stable decisions first
These edits usually benefit from batch application:
- White balance: Keep the set within the same visual temperature, then correct unusual casts individually.
- Contrast curve: Use a shared tonal character so the portraits feel related.
- Background treatment: Sync the intended neutral, corporate, or studio direction when the backgrounds support it.
- Grain and finishing: Apply a consistent texture or clean digital finish.
- Output sharpening: Keep the final sharpening behavior consistent for the delivery type.
These edits should vary by frame:
- Exposure compensation: A face that renders darker needs a different correction from a face already sitting correctly.
- Dodge and burn: Facial planes, hair, and clothing folds aren't identical from one portrait to another.
- Local color shifts: A jacket, wall, or skin area may need a targeted adjustment without changing the entire set.
- Crop and scale: Different head angles and hair shapes require different breathing room.
- Expression and pose decisions: A professional profile may need restraint, while an actor portfolio can support more range.
Use masks or adjustment layers for outliers. A bright window behind one subject shouldn't force you to rebuild the global exposure for everyone. Likewise, a shadow under one jawline is a local problem, not a reason to alter the entire reference look.
AI is particularly useful for repeated portrait cleanup. It can help coordinate skin retouching, teeth, hair, clothing, and background corrections across a gallery, while a human editor reserves detailed manual work for the lead image or the most visible customer-facing portrait. For broader context on applying AI consistently across visual assets, see this practical AI workflow for beauty brands.
A platform such as Secta Labs can also fit this workflow by letting users refine generated headshots through browser-based edits to clothing, expressions, backgrounds, hair, lighting, and retouching. Use those controls to create variations deliberately, not to make every portrait share identical facial treatment.
Finish with a thumbnail sanity check. Reduce the portraits to a small viewing size and flip through them quickly. The set should read as one body of work, with related tone and polish, rather than a collage of unrelated generations. For more detail on creating a repeatable color process, use this AI color grading workflow.
Keeping Consistency Without Making Every Photo Identical
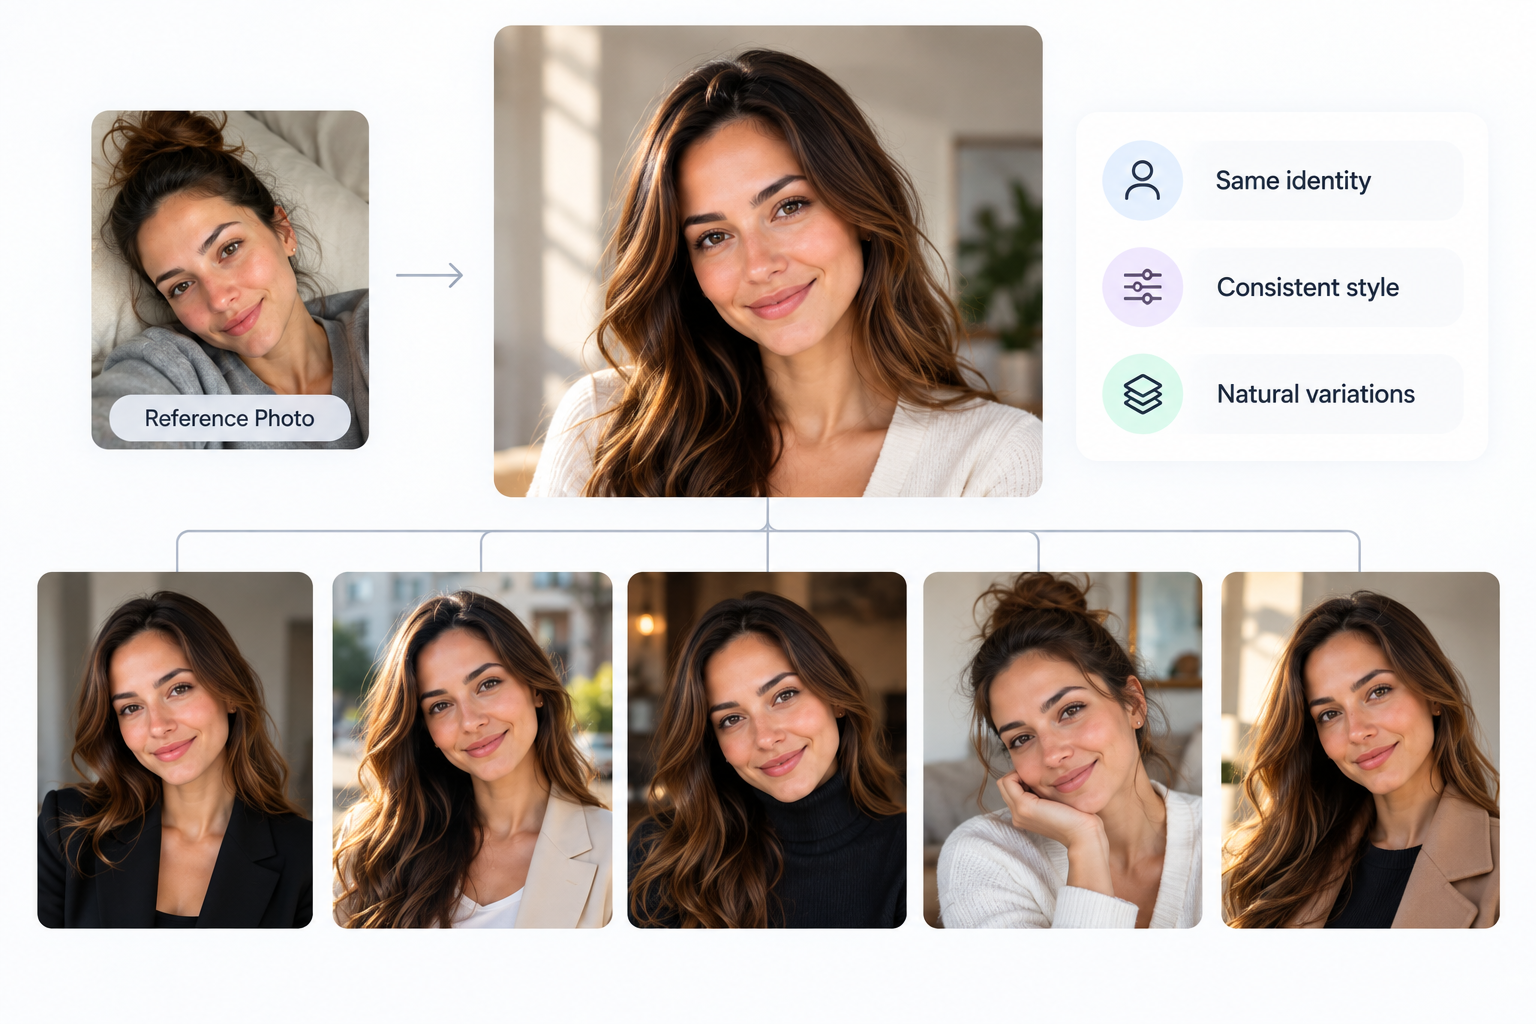
The strongest batch edit creates a family resemblance, not a clone army. A team page looks credible when every portrait shares the same level of polish, background logic, and tonal character while preserving each person's natural features and individual presence.
Choose a reference frame with the correct skin tone, white balance, and key-light direction. Then let the edit vary where the subject demands it. A darker portrait may need additional shadow lift. A person in a deep jacket may need a local clothing adjustment. A face turned slightly away from the light may need a different exposure correction from a front-facing portrait.
Coordinate the elements that customers notice
AI masking helps isolate the subject from the background, which gives you separate control over facial retouching and backdrop treatment. Keep the background neutral and related across the set, but don't force every background to have the same exact brightness or texture when the composition calls for a variation.
The same principle applies to crops. A LinkedIn portrait often benefits from a vertical composition, while an internal team directory or chat profile may use a square crop. Preserve the correct head scale and eye position for each destination instead of forcing one universal frame onto every platform.
Gaze direction also deserves flexibility. If every person looks in precisely the same direction, the set can feel manufactured. Align the portraits enough to support the layout, but allow natural differences in expression and eye-line when they strengthen the subject's credibility.
Consider a team portrait set where some people have soft studio lighting and others have more directional office lighting. Apply the same visual foundation, then flag the lighting groups for separate curve adjustments. The result should share a palette and finish without pretending that every face received the same light.
Use AI to coordinate variation
Older batch workflows are built around copying the same adjustments to every selected image. That remains useful for stable decisions, but it isn't enough for mixed AI portraits. Newer AI workflows are moving toward context-aware edits that preserve a reference style while changing the treatment by image, as described in Adobe's guidance on editing multiple photos.
The shift matters because customers usually want consistent results without artificial uniformity. A professional needs a portrait that looks like them, not a generic avatar with their face placed into a repeated template. An HR team needs a coherent visual identity, not a wall of identical expressions and crops.
Firefly's profile picture workflow demonstrates this kind of targeted adaptation. Users can remove or replace a background, adjust lighting, expression, and clothing through prompts, and continue refining the result in Photoshop on the web or Adobe Express, as explained in Adobe's profile picture editor. That approach is more useful than regenerating the entire portrait when only one element needs to change.
Exporting and Quality Controlling the Final Set
Decide the output structure before rendering the first file. Batch exports become chaotic when filenames, color space, dimensions, and delivery versions change halfway through the process.
Use a naming convention that identifies the person, purpose, platform, and session. A pattern such as LastName_FirstName_Use_Platform_Date makes it easier to locate every LinkedIn crop or team-page portrait without opening files one by one. Keep the source name available in metadata or a project record so the final image can always be traced back to its origin.
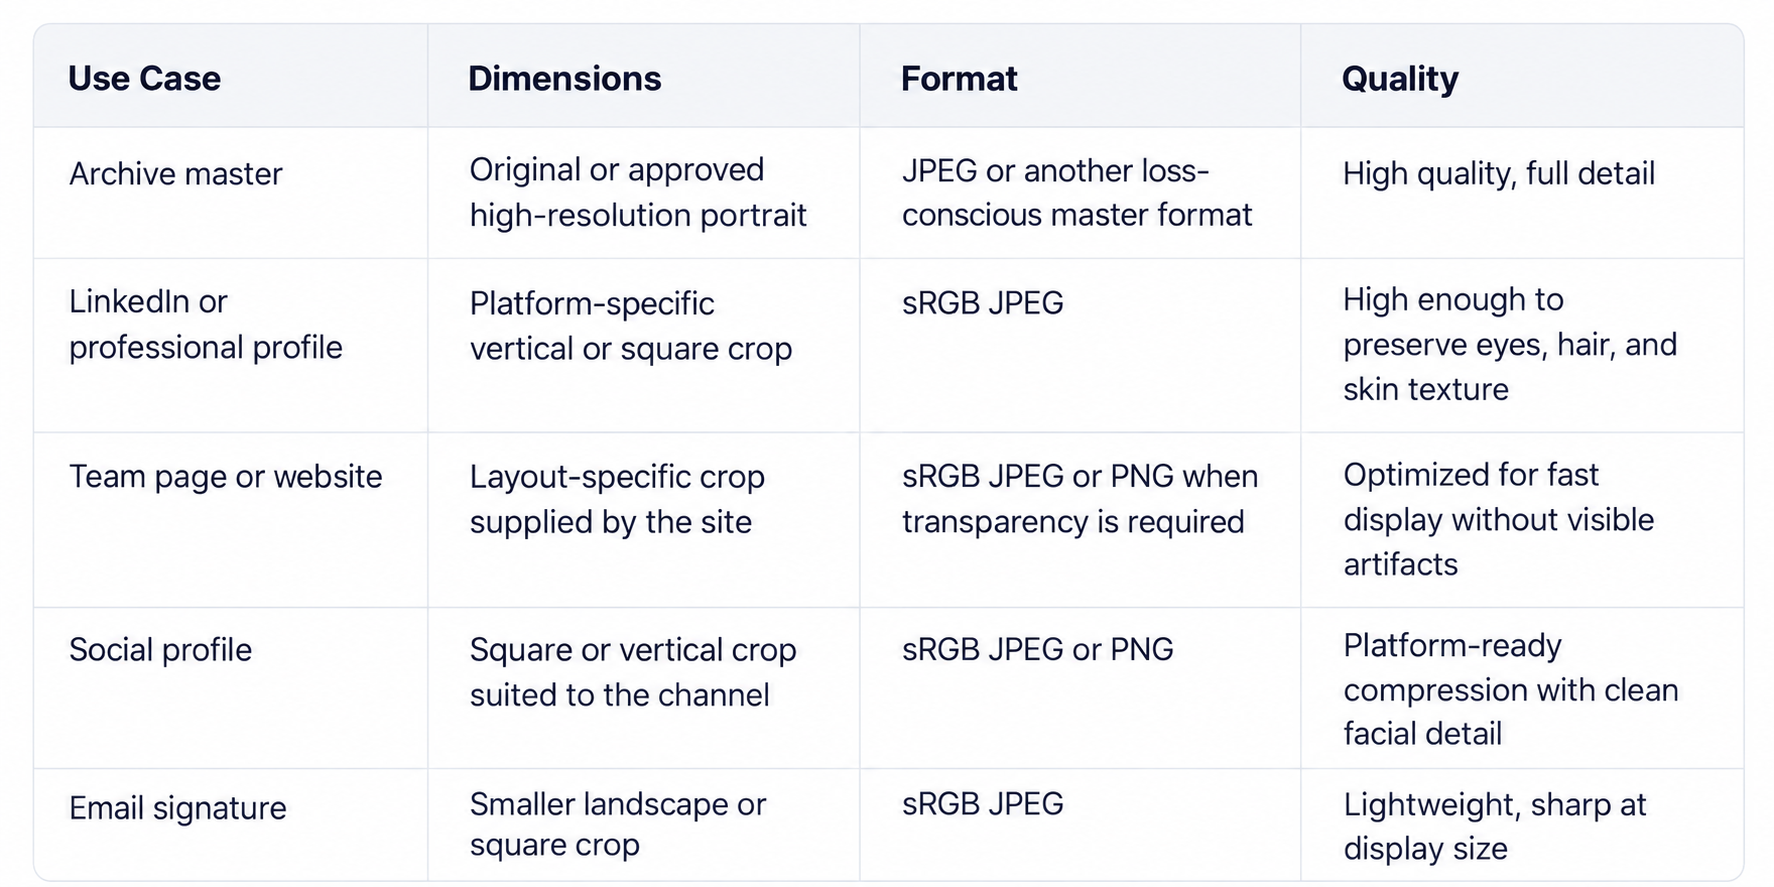
Create two broad delivery tiers. Keep a high-resolution master for archiving and a platform-ready version for everyday publishing. Export in sRGB for web and profile destinations unless a specific print workflow requires something else. For AI portraits, prepare the common vertical, square, and horizontal crops your customers use, rather than exporting a single shape and forcing them to crop it later.
Inspect at two scales
Review the eyes, teeth, hairlines, ears, and clothing edges at full size. AI errors often hide in small transitions, such as an eyelid that doesn't match the gaze, a hairline that melts into the background, or a collar that changes shape between frames.
Then zoom out and inspect the set at a reduced size. Look for color drift, inconsistent head scale, uneven background density, and portraits that appear sharper or softer than their neighbors. A single image can look excellent on its own while disrupting the entire collection.
Use a calibrated monitor when possible, and spot-check files across the set rather than approving only the first export. A contact sheet is especially effective because it reveals mismatched crops and tonal changes immediately. For a more formal review structure, document the steps in a repeatable quality assurance process.
Archive the XMP sidecar or equivalent edit metadata when your editor supports it. That keeps the adjustment stack reversible and lets you reproduce a variation without flattening the decisions into an opaque final file.
Troubleshooting Common Batch Editing Problems
Most batch failures begin with weak source organization, not a missing software feature. If the selected portraits differ wildly in crop, identity quality, or lighting direction, no preset can make them feel naturally related without individual intervention.
Uneven white balance is the first issue to fix. Sync temperature across the appropriate group, then adjust tint per portrait. Don't compensate for one green cast by warming the entire set, because the correctly balanced faces will become too orange.
Correct the failure at its source
Plastic-looking faces usually mean the retouching was synchronized too aggressively. Reduce the smoothing strength and apply it only to appropriate masked areas such as cheeks and forehead. Preserve pores, natural lines, and the structure around the eyes. A polished headshot still needs to look inhabited.
Inconsistent head angles require a composition correction, not a heavy crop. Use auto-rotate when the tool supports it, then make a small manual adjustment. Cropping away a tilted pose may remove the symptom while leaving the head scale and eye-line inconsistent with the rest of the set.
Background color shifts often indicate that the preset is affecting whites or neutral tones. Separate the background adjustment from the face and clothing treatment, then sync that background layer independently. This gives you control over backdrop consistency without washing out skin or shirts.
Skin tone variation demands a deliberate calibration pass. A look tuned on lighter complexions may introduce unwanted color or contrast on darker skin. Review the midtones, shadow transitions, and highlight behavior on each complexion, then adjust the portrait locally instead of pushing a global correction that harms everyone else.
Adobe Firefly's portrait workflow supports controlled variations through options such as Intensity and Strength, along with Effects and Tone settings for lighting and camera angle. It also generates multiple options for selection, which is useful when the first result doesn't preserve the subject's identity or intended mood, as outlined in Adobe's AI portrait generator workflow.
Stop treating batch as identical
Evoto AI describes a portrait workflow where users can synchronize color, retouching, background, clothing, and accessories across selected images, while its Headshot Crop feature uses facial recognition and composition suggestions to coordinate crops. That model shows the useful distinction between shared direction and fixed output, as described in Evoto's headshot photography workflow.
A coherent set may contain different exposure corrections, crop decisions, expression choices, and background intensities. If you force every image to use identical values, you'll often get flat faces, awkward spacing, and an uncanny sense that the portraits came from a template.
The best answer to how to edit multiple photos is therefore selective automation. Sync what defines the brand or campaign, adapt what defines the individual, and inspect the exceptions before delivery.
Choose one representative portrait set and run this workflow from source organization through final quality control. Build a small reference library, flag the images that need adaptive treatment, and use an AI headshot studio to generate and refine coordinated variations without rebuilding each portrait by hand. Your customers should receive a polished collection that feels consistent, personal, and ready for its exact professional use.