Email Signature Photo Size: Exact Dimensions for 2026
A headshot in an email signature should display at 100 × 100 px, and the full signature should stay at or below 600 px wide. That pair of numbers settles nearly every layout question you'll meet, from a phone in dark mode to a desktop client that refuses to scale anything.
The width ceiling deserves respect because your signature is competing for a column the width of a handset. The Exclaimer email signature handbook puts a professional headshot at roughly 50 to 100 px square and keeps the overall signature no wider than about 600 px, which is where every practitioner lands after opening a broken template on a phone. The photo is the largest single block in that strip, and it's the one element that has to stay recognisable when it's the size of a thumbnail.
Here's the reframe that makes the rest of this article simple. You aren't picking a photo size. You're solving a rendering problem: one portrait has to read as a face on a phone screen and fit inside a 600 px block on a large monitor. Get the export right once and every client downstream behaves.
Email Signature Photo Size at a Glance
For most professionals, the square headshot beside the name displays at 100 × 100 px. Compact layouts use 80 to 100 px, a larger portrait treatment goes to 150 × 150 px, and the whole signature stays at or below 600 px wide. The WiseStamp guide to signature image sizes sets a compact professional headshot at approximately 80 to 100 pixels wide and 80 to 100 pixels high, with 100 × 100 or 150 × 150 as the common larger options and the overall signature no wider than about 600 pixels.
Notice what that range buys you. A 100 px square carries a face clearly, leaves three quarters of the strip for your name, title and phone number, and stays light enough that a phone on a weak connection renders it without a stall.
Trasformate la vostra immagine professionale
Ottenete splendidi scatti professionali generati dall'intelligenza artificiale in meno di un'ora. Caricate normali selfie o foto di gruppo, scegliete tra oltre 100 stili e noi creeremo centinaia di scatti perfetti che rappresenteranno il vostro lato migliore.
Why the square crop does the work
A square source is the most useful shape a signature can hold because it survives every presentation clients throw at it. Rounded and circular avatar treatments expect a 1:1 image. Feed them a wide rectangle and you get a stretched head or a letterboxed strip with wasted space on both sides. In a narrow mobile column the square wastes nothing, which is why the same crop scales down without the face losing its anchor in the frame.
The same guide makes a point worth pinning above your desk: don't insert the original HD portrait. Resize a copy into a dedicated email version, keep the face and shoulders, crop square, and target roughly 100 to 150 pixels at display size.
Recommended email signature photo sizes by layout
One portrait, three exports
You don't need three photoshoots for three sizes. A single generated portrait, cropped on the face with the shoulders visible, exports down to any row in that table in minutes. Keep the high resolution master for LinkedIn and profile pages. The 100 px version is a delivery format, never the original.
The three-step rule
- Pick the layout first. Decide whether the photo sits alone beside your name or inside a full contact block, because the layout sets the available width before anything else.
- Match the size from the table. 80 to 100 px for compact, 100 px for standard, 150 px when the face should lead.
- Check the total width. If the assembled signature crosses 600 px, shrink the photo before you cut a single line of text.
Each section that follows takes one of those steps apart: roles and sizes, the client limits that decide whether anything renders, how hard to compress, and how to export a portrait that holds up at all of them.
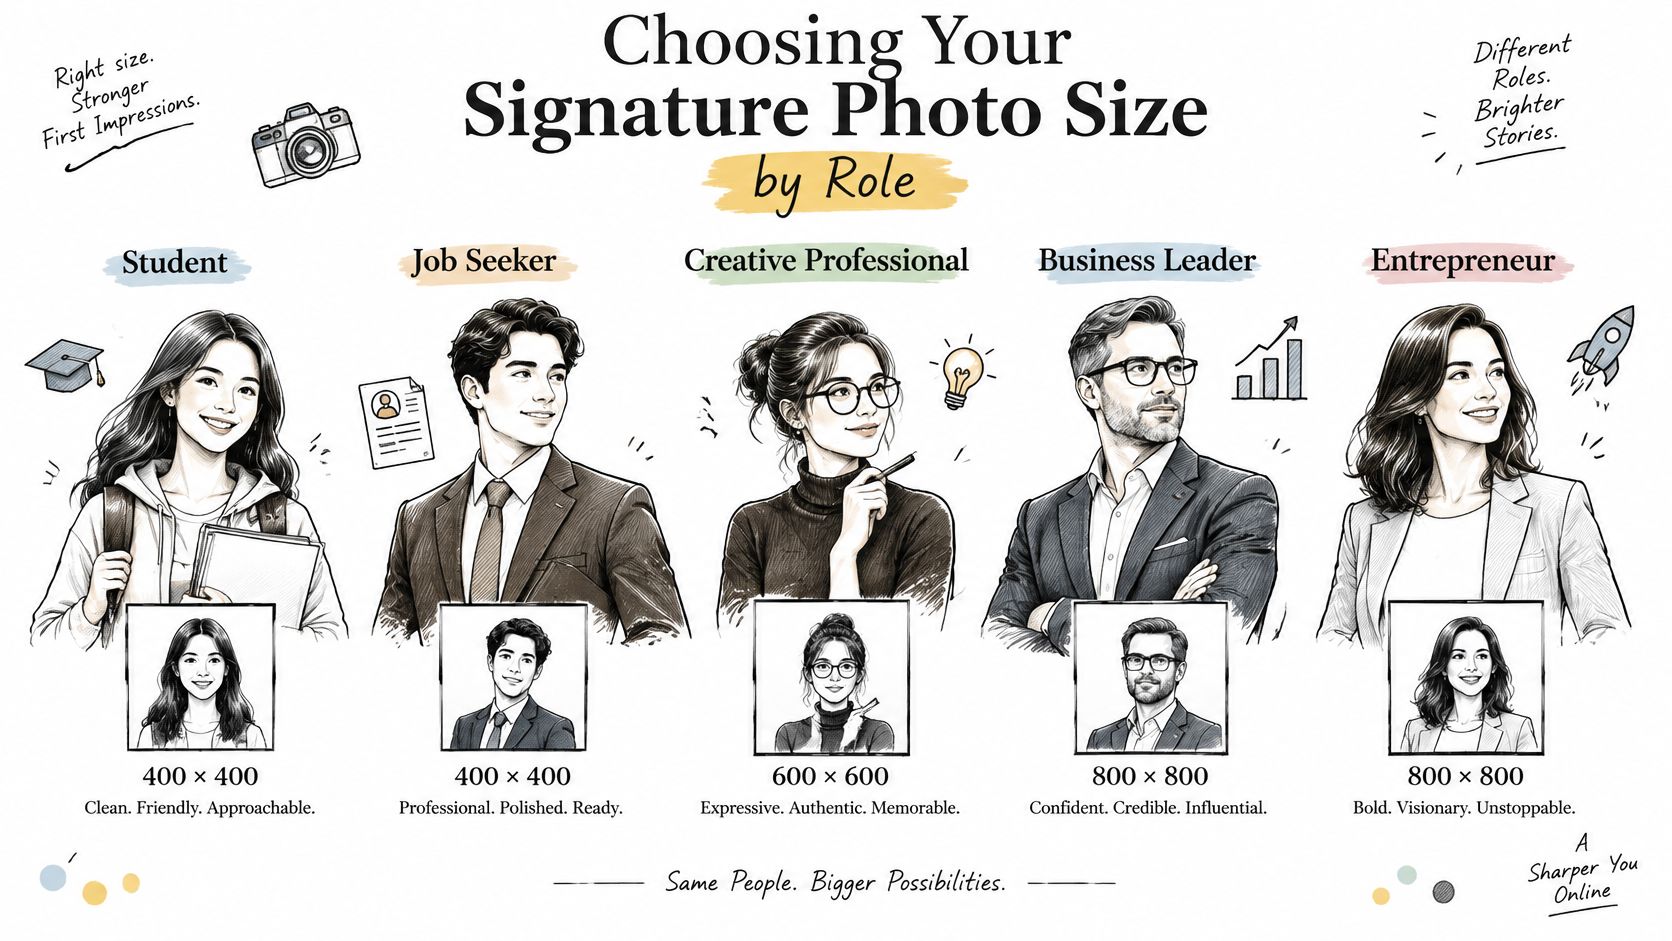
Choosing Your Signature Photo Size by Role
Role decides size before taste gets a vote. A recruiter and an actor need different amounts of face in the same 600 px strip, and matching the layout to the job is faster than fiddling with sliders.
Working professionals maintaining a LinkedIn-style profile use 100 × 100 px. It reads instantly and never dominates the message. Sales, real estate and client-facing agents stay at 100 × 100 px, or step up to 150 × 150 px when the face has to carry trust, because a clear face in a consistent frame makes a stranger look safe to reply to. Executives, actors and personal brands go to 150 × 150 px so the portrait reads like a portfolio image rather than a badge. Creators, coaches and consultants should hold at the compact 80 to 100 px end and spend the saved width on links.
Then there's the case almost nobody plans for: a team. HR and marketing don't need a good size, they need one size and one crop across every employee, applied without argument. Team headshots here are set up in five steps: set up the brand kit, invite team members, run batch generation, review and approve, then download and deploy. Every member's portraits are generated at the same time, and employees can be anywhere, so a distributed company ends up with one directory that looks deliberate.
If you're hiring at volume and want photos to stay consistent from offer letter to company page, AI tools for recruiting agencies is a useful map of what's available.
Pick your role, read its row in the table above, and export that version before you touch a resize handle.
Signature Width and Height Limits by Email Client
600 px is the ceiling, and everything else is a negotiation inside it. Email clients don't render a signature the way a browser renders a web page. The Scribe Mail handbook on signature image size puts the cross-client maximum at about 600 pixels, with 320 to 600 pixels as the workable total width and roughly 450 pixels as a comfortable midpoint, because each client applies its own HTML, scaling, image loading and mobile width rules.
Cross that ceiling and the client picks one of three outcomes, none good: the layout overflows sideways, the whole strip compresses, or the photo wraps onto its own line under your name. You don't get a vote on which one happens.
Signature width and height limits
A worked example that fits every limit
Take a horizontal block: photo on the left, name and title stacked to its right, phone number underneath. A 100 px square headshot, two lines of text and a number sit inside a 400 × 100 px block with room to spare. That shape clears the 320 to 600 px width range, lands inside the recommended Gmail image width, and leaves half the allowed signature height unused.
Work from the block outward, never from the photo inward. If you add a logo later, the logo takes the leftover width and the photo keeps its square. If the headshot is what pushes the layout past 600 px, shrink the face before you cut text, because a squeezed name is harder to read than a slightly smaller portrait. On a phone that same image renders near 100 px wide, so judge the crop at that size, not at the size your export tool shows you.
The same outward logic applies to every image your work publishes. A link preview rendered at 1,200 px wide that crops your logo is the same failure in a different container, and WebinOne on social sharing images covers how to size one so platforms don't decide for you.
Check the source portrait against the headshot photo requirements before you export, because a file that hits every pixel limit still fails if the face is too small in the frame at 100 px.
File Formats and Weight Targets for Signature Photos
Format is a one line decision. JPEG for the face, PNG for anything with flat colour or transparency. Photographs compress beautifully as JPEG and bloat as PNG. Logos, icons and anything that needs to sit on a coloured background or in dark mode need PNG, because a JPEG with a white box behind it turns into a visible rectangle on a dark template.
Weight is where most signatures fail. Every email carries the image file, so a 900 KB portrait multiplied across a month of sending is weight your recipients pay for on mobile data.
File format and weight targets
In 2024, Right Inbox's email signature size guide recommended keeping individual signature images under 15 KB and the overall signature under 40 KB to keep email lightweight. I treat those as the target and 50 KB as the hard ceiling for a headshot, because once the photo clears 50 KB you're paying for detail nobody can see at 100 px.
What compressing actually costs you
Almost nothing, if you crop before you compress. A 100 × 100 px JPEG exported from a high resolution AI portrait and saved at 80 percent quality holds sharp eyes, clean hair edges and a recognisable smile at about 10 to 15 KB. Drop the crop and squeeze the full frame instead and you'll see mush across the eyes, which is the detail that makes a face look like a face.
The common error is inserting the original HD file and letting the email client shrink it. The client may render it at the right display size, but the file still travels at full weight in every message, and some clients ignore the display attributes and show it larger than intended.
How to Resize an AI Headshot for Your Signature
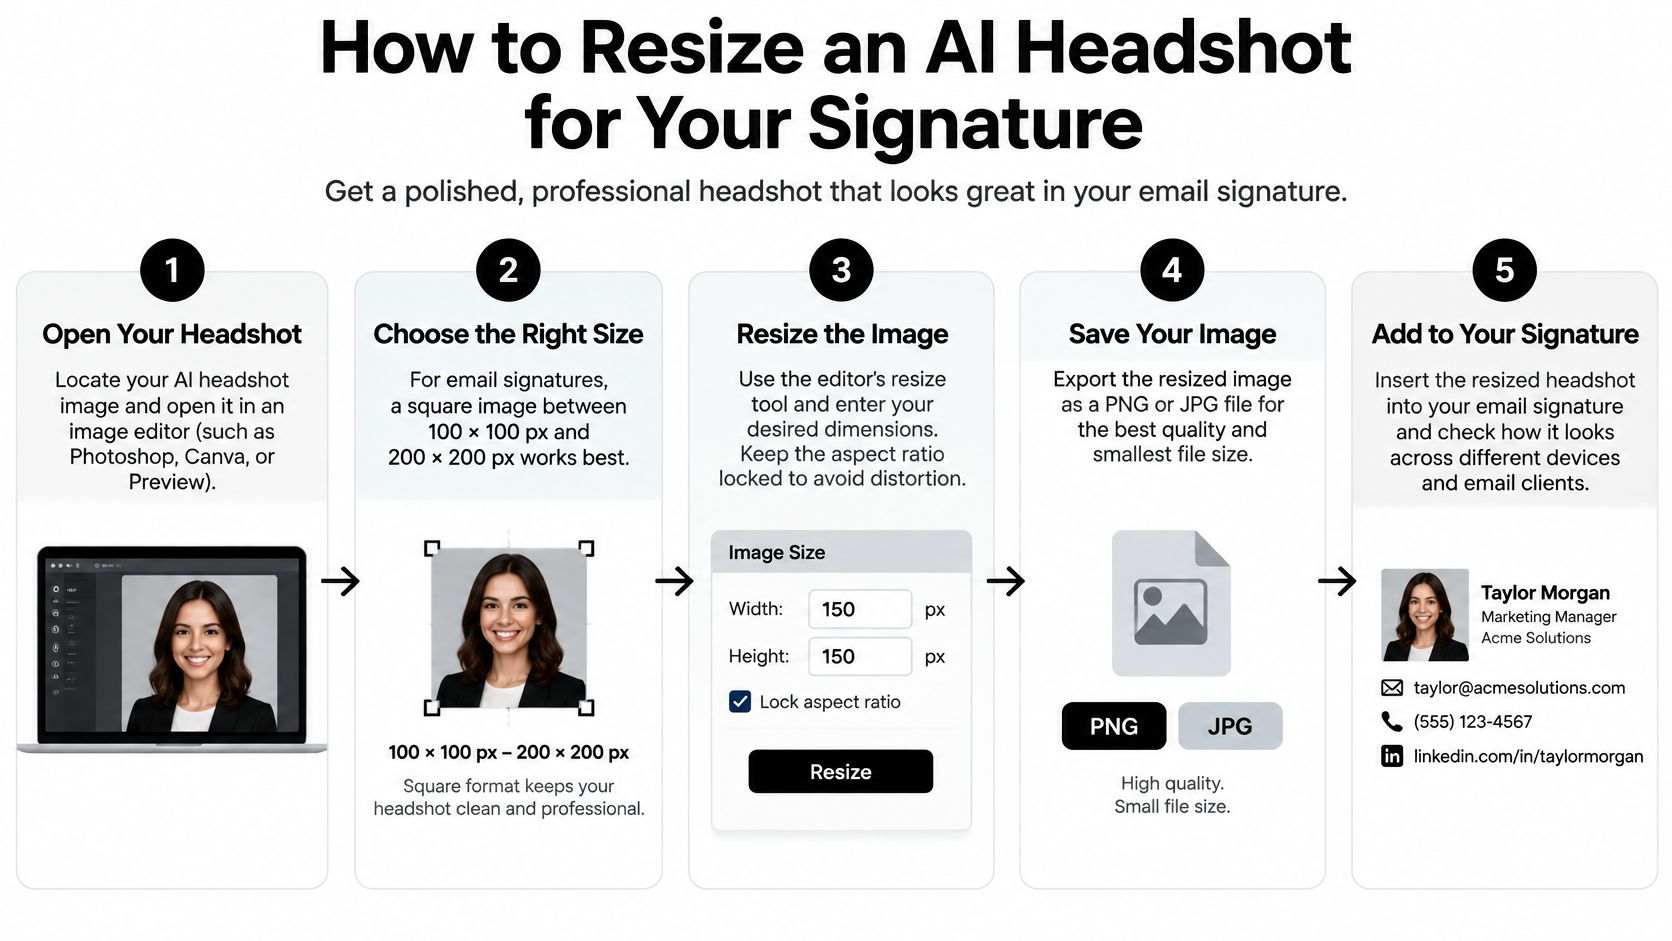
Start from a clean generated portrait with a neutral background, the face and shoulders in frame. Then work through the same seven steps every time, so the output is repeatable rather than a fresh puzzle.
- Choose the right base image. A busy background turns to noise at 100 px, so pick a portrait with separation between the subject and the wall behind them. If the framing is close but the background is wrong, change the background first and export after.
- Keep the master file. Export a copy for the signature and leave the high resolution original untouched for LinkedIn, profile pages and print. The signature file should never be the only version you have.
- Crop to a square centred on the face, shoulders still visible. This is the step that protects facial detail when everything shrinks. A tight head-only crop loses the jawline and reads as a floating face.
- Resize with the aspect ratio locked to 100 × 100 px, or place the square on a 400 × 100 px canvas when the photo sits beside your name and title. Google's Gmail signature help page sizes a signature image at 300 to 400 pixels wide and 70 to 100 pixels high, which is why that horizontal canvas is the practical target.
- Save as JPEG and compress until the file lands under 50 KB, ideally under 15 KB.
- Insert the image and set matching width and height attributes in the signature so clients don't rescale it unevenly. If the numbers in the HTML disagree with the file, some clients trust the file.
- Send a test email to a phone and a desktop client. Confirm the photo, name and layout stay together and the face is still sharp. Clients scale images differently, and the test is the only proof you'll get.
Starting from a generated portrait shortens this whole sequence. Secta retrains a copy of the Stable Diffusion model on the photos you upload, then generates headshots with that copy, so the framing, lighting and background are already controlled before you open an editor. No studio booking, no retouching pass, no re-shoot because the shirt was wrong. If a step still trips you up, this guide on how to fix resolution handles the export problems that show up after cropping.
The finished asset is a clear face in a 100 px square, in a file that loads the moment someone opens your email.
How Signatures Render Across Email Clients
Your signature doesn't render once. It renders in the webmail tab, the desktop client, the phone app and the forwarded copy, and each one makes its own decision about your image.
Gmail holds a signature image inside its own ceiling, so a horizontal block that already fits arrives sharp instead of being rescaled. Outlook keeps an inserted picture at the size you set, which is why you resize with the ratio locked and then verify the width and height values in the HTML rather than dragging a corner until it looks right. Apple Mail and phone apps shrink the message to the screen width, which is where the width ceiling earns its keep: a layout that looks tidy on a wide monitor can wrap so the photo drops onto a line of its own beneath your name.
Circular and rounded crops depend entirely on a square source. Clients that don't support rounding show the square, so centre the face and both versions look intentional.
Replies and forwards keep the photo in most clients, but some block images until the recipient allows them. That's the argument for a signature where the name, title and phone number still identify the sender with every image hidden. If a contact has to guess who wrote to them, the photo was carrying too much of the identification load.
Common Mistakes and Pre-Send Checks
Most broken signatures break in the same five ways, and four of them are photo problems.
Signature sizing mistakes, effects and fixes
The repair order matters more than people expect. Reduce the photo first, then trim the text column, because the photo is usually the heaviest and widest element in the block. Cutting text before shrinking the image leaves you with a cramped signature and a photo that still overflows.
The pre-send checklist
Run this once for every new signature, then keep the finished 100 × 100 px export saved as a template so the next update takes minutes:
- Width: total signature at or below 600 px.
- Height: full signature 100 to 200 px with no promotional banner.
- Headshot: 80 to 150 px square, face still recognisable at arm's length.
- Weight: JPEG under 50 KB, ideally under 15 KB, whole signature under 40 KB.
- Proportions: aspect ratio locked, face and shoulders in frame, nothing stretched.
- Render test: webmail, desktop client and phone app, plus a reply to confirm the photo survives.
If any line fails, fix the photo and retest. Once the square export exists, every repair is an export away rather than a reshoot.
Generate a Signature-Ready Headshot Today
Start with the portrait that fits the role you picked earlier, then take the export steps in order.
Secta Labs generates the source image you need for a signature without a studio. You upload 10 to 20 photos and select your gender, and regular selfies or group photos both work as input. Upload once and you get hundreds of studio-grade portraits back in under an hour, so you can compare several and pick the one with the cleanest background and the most direct gaze. That is the portrait that stays recognisable at 100 px.
Then move straight down the list: export the 100 × 100 px copy, compress it until the file sits under 50 KB and ideally under 15 KB, insert it with matching width and height attributes, and send a test email to a phone and a desktop client. Check that the whole block stays under 600 px wide.
One square export handles both ends of the rendering problem. It stays clear when a phone shrinks it to thumbnail size, and it fits inside a 600 px signature block on desktop without pushing the text column sideways.
That sequence takes an afternoon. A studio booking, a retouching cycle and a second round of resizing once the first files came back wrong take considerably longer, and you still end up doing the export work yourself at the end of it. Choose your portrait, build the square export, and put the photo in the signature where it belongs.