How to Change Background in Photo: Steps That Look Real
The cutout is the easy half. Lifting a person out of a photo takes one click, and the tools have been competent at it for years. What separates a believable swap from a visible fake is everything after the mask: light direction, shadow geometry, hair edges and whether the result is honest about being edited. Layered editing turned this from retouching into compositing. Photoshop 3.0 introduced layers in September 1994, letting a subject and a background sit as independent, editable elements, the milestone Adobe's 35-year Photoshop retrospective identifies as the point where background changes became repeatable work.
Most tutorials stop at the selection. When learning how to change background in photo, the answer starts with picking the right method and ends with a full-size inspection, not with a magic wand. Does the light fall from the same side as the face? Is the contact shadow physically possible? Do the hair strands taper? Does the viewer know a scene was generated? Get those right and a free app output can pass. Get them wrong and the most expensive retouch in the world still looks like a sticker.
Three Ways to Change a Photo Background Compared
The method should follow the output, not your patience. One social post needs a phone app and ninety seconds. A file that gets printed and inspected needs manual masking in Photoshop. Four matched portraits of one person, for LinkedIn, a company page, a conference bio and a casting submission, is the case where an AI headshot tool wins, because you compare finished variations instead of masking one face four times.
Manual masking rewards patience and pays you back in hair, glass and fabric edges that survive close inspection. Phone apps have earned their place. DataIntelo valued the global AI background-removal market at $412.8 million in 2025 (DataIntelo's AI background-removal report), which is what a commoditized one-click cutout looks like, and commodity tools inherit commodity limits on fine detail.
AI headshot tools such as Secta Labs generate a person's portraits against new backgrounds from photos you upload, so the work becomes choosing and comparing backdrops rather than masking each version by hand. The trade is control: you steer the scene, not the individual pixel.
Find your deadline and output type in that table, take the row that matches, and start with the first step.
Transforme su imagen profesional
Consigue impresionantes retratos profesionales generados por IA en menos de una hora. Sube selfies normales o fotos de grupo, elige entre más de 100 estilos y crearemos cientos de instantáneas perfectas que representen lo mejor de ti mismo.
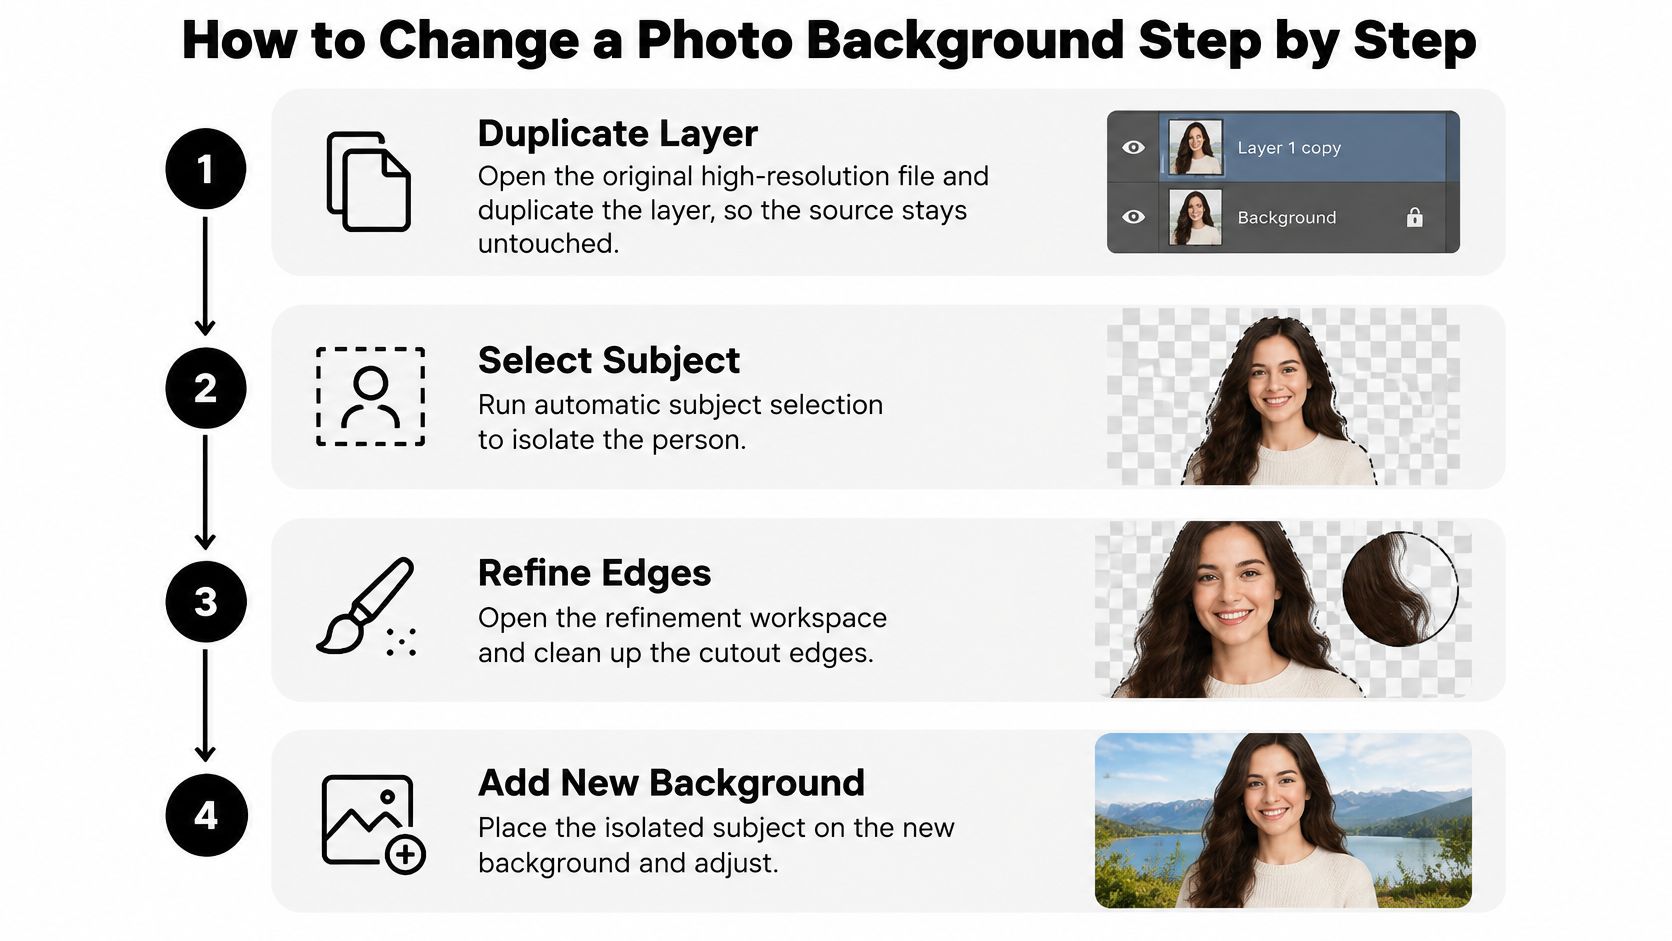
How to Change a Photo Background Step by Step
A swap that survives a client review is a masking job before it is a design job. Adobe's own background replacement workflow is non-destructive from the first move: isolate the subject, refine the boundary in a dedicated workspace, and output a layer mask instead of deleting pixels, so the original image stays available for later correction (Adobe's background replacement walkthrough). The sequence below follows that logic from start to delivery.
- Duplicate the source layer. The duplicate preserves the original pixels, which matters when you need to redo the mask at a different crop or resolution six months later. The common slip is editing the only layer you have, then discovering the mask is baked in at delivery time.
- Run automatic subject selection. A modern selection captures most of the silhouette in seconds and saves you the tedious lasso work. Adobe warns that initial automatic selections aren't expected to be perfect, and the slip is treating the first result as final.
- Refine the boundary at high magnification. Zoom into the contour and work hair, semi-transparent edges and missed regions with the refinement brushes. Skipping this step is exactly why so many swaps show a straight-line haircut.
- Output to a layer mask. A mask hides pixels without destroying them, so every later correction becomes a brush stroke instead of a fresh start. Deleting the background outright is the most expensive shortcut in this entire workflow.
- Place the new background beneath the masked subject. Stacking order keeps the foreground on top and lets you swap scenes without touching the mask. The slip is pasting the person onto a new canvas and re-masking there, which doubles the work and throws away the original.
- Scale and position the background, then inspect at 100 percent. Actual pixels reveal halos, missing foreground and hard edges the fit-to-screen view politely hides. Judging the swap at 25 percent is how jagged hair reaches a client inbox.
- Flatten only after the file is approved. Keeping layers and the high-resolution original lets you revise without repeated resampling. Flatten too early and every change costs you the whole edge pass again.
Here is the same sequence compressed into the four moves that carry most of the quality.
What a Clean Edit Looks Like at Full Size
Hair tapers into individual strands rather than ending in a soft blur. There's no pale rim where the old background used to be. Glasses keep their frames and show the new scene through the lens. The subject's contact shadow points the same way as the new light. And the edge transition matches the sharpness of the rest of the frame. If any of those fail at 100 percent, the edit isn't finished, however good it looks on a phone.
Matching Light, Shadows and Color So the Swap Looks Real
Viewers forgive a background they've never seen. They don't forgive one that's lit wrong. A headshot lit by soft window light from the left, dropped onto a scene under hard overhead sun, reads as fake before anyone can articulate why. Adobe names mismatched lighting and shadows as conspicuous indicators of a composite and recommends building from source elements shot from similar viewpoints under similar light (Adobe's photography effects guide).
- Pick a background with a similar camera height and depth of field. Eye-level to eye-level, and don't pair a soft portrait with an architectural photo that's sharp from front to back.
- Align horizon and perspective first. A tilted desk edge or a window frame running at the wrong angle undoes everything else you do.
- Scale using a recognizable reference. A doorway, a desk edge or a window gives you a real-world measurement to anchor the subject's size against.
- Match exposure and white balance. A cool subject on a warm scene looks pasted even when the mask is flawless.
- Add a contact shadow only where the original light implies one. A portrait shot with soft ambient light gets a soft, short shadow or none at all, never a hard cast shadow to the right.
- Apply a restrained global grade. A light pass that pushes both subject and background toward one color cast does more for believability than any local edit.
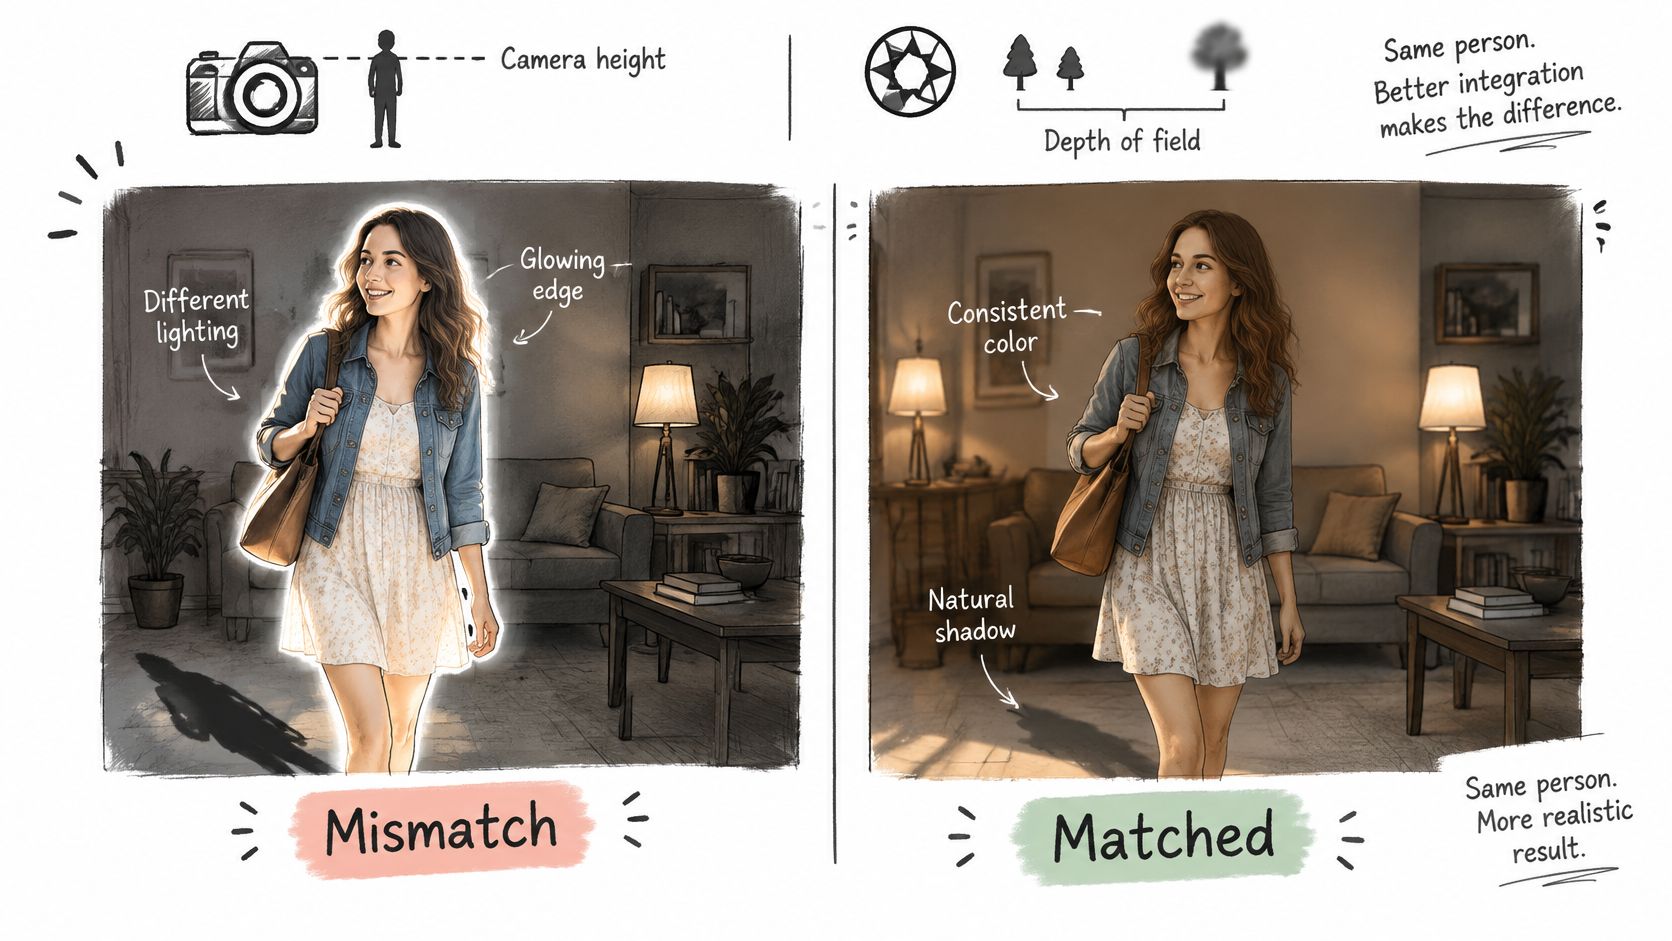
Keep lighting and color on separate adjustment layers so you can change the exposure without redoing the mask. And resist the urge to drop a sharply focused subject onto a heavily blurred backdrop; unless the original capture had that shallow depth of field, the mismatched falloff looks synthetic. The professional headshot lighting breakdown covers the capture side if you're shooting the original yourself.
If the same portrait will sit next to a live webcam feed in a call, match the backdrop temperature to the room where you work. These Zoom interview tips for candidates from Interview Pilot treat background and front light as one setup, which is the right mental model. Generating several AI variations with different lighting lets you compare options side by side and pick the one that agrees with your face, instead of guessing.
Fixing Hair, Glasses and Edges That Give the Edit Away
Halos expose a swap faster than any other defect. A pale rim of the old background clings to the hair because the selection stopped a pixel short or the edge kept contaminated color, and the eye catches it instantly against a dark backdrop. Automated segmentation gets close and then stops. Contemporary methods score above 90 percent on standard measures, with one reported method reaching 92.41 percent mIoU, 94.03 percent precision and 97.88 percent recall in the cited evaluation (academic review of image segmentation). On a wide shot that is excellent. On a headshot where hair fills a third of the frame, that remaining fraction is the entire problem.
Two Habits That Catch Most Edge Failures
Inspect hair and translucent edges at 200 to 400 percent zoom, then check the final crop at the size it will be used. Thumbnails hide jagged edges, and a mask that looks acceptable at preview size can fall apart in a full-resolution headshot. Take curly hair against a pale gray wall: the fix is a dedicated hair brush pass with a small, hard brush and a soft edge, not a bigger selection.
If the original also has a bright reflection across the glasses, deal with that before you mask, since glare and a bad cutout look identical at a glance. This walkthrough on removing glare from a photo online free handles that repair.
Keeping Your Face Accurate After the Background Change
Swapping the scene is the safest edit you can make to a portrait. A study of protective methods for malicious portrait editing compared facial-feature changes, accessory adjustments and background alterations, and found that background alteration generally produced the highest facial-recognition similarity scores across the tested methods (portrait editing study on arXiv). Your face carries the identity. The room behind it doesn't.
Generative systems can still invent detail. NIST warns that AI image processing can turn lower-quality facial imagery into high-resolution output while introducing apparent detail that doesn't accurately reflect the subject's real features, and recommends extreme caution with facial images (NIST reference document on generative AI for facial images). Treat the background change as the safe part of the operation and still verify the face.
- Compare the new image against the original at 100 percent. Side by side, same crop, before you judge anything about the background.
- Check ears and glasses first. They distort faster than any other feature, and glasses also carry the edge risk from the mask.
- Generate several versions and keep the closest one. More variations beat one lucky result, and choosing takes a minute.
Lighting, pose and background are production variables that change how professional a portrait reads without altering the morphology of the face (Cyberpsychology study on AI profile pictures). That's why one face can carry several settings: say a consultant uses a light-gray backdrop for LinkedIn, a branded workplace scene for the company page and a warmer lifestyle setting for social content, all with the same unchanged features. Picking the most faithful version is faster than booking a separate reshoot for each platform.
Disclosing AI Background Edits Without Misleading Viewers
A background swap can change what viewers believe about a person, product or place. Use that distinction to decide whether to disclose: routine cleanup, color correction and background blur generally do not need a label, while photorealistic edits that could mislead may require one, according to the IAB AI Transparency and Disclosure Framework.
The practical dividing line is cosmetic versus locational. Replacing a headshot's background with a neutral studio setting changes the scene without making a claim about where the photo was taken. Showing a property listing against a different property can mislead buyers, while an actor using a studio backdrop for a casting submission does not make the same claim. Meta's AI Info labels for images may appear when its systems detect industry-standard signals or when users disclose AI creation.
Disclosure can affect how viewers judge an image. A preregistered experiment comparing AI-generated professional headshots with photographs of the same subjects found that the AI images received slightly higher photo-quality ratings, while an “AI-generated” disclosure modestly lowered perceived quality (Cyberpsychology disclosure experiment). State what changed plainly; credibility matters more than a small boost in polish.
Keep the original, dated, unedited file and record which tool changed the background. Before posting, check the platform's current rules and use AI image detection to examine what its classifier may detect. Describe the edit accurately rather than claiming either that the image is untouched or that every adjustment was AI-generated.
Run the AI Headshot Route and Check the Result
- Upload 10 to 20 clear photos of yourself, ideally from one session so the lighting and angles stay consistent.
- Choose two or three backgrounds that match where the portraits will run. Pick for the placement, not for the aesthetic.
- Generate a set of variations and compare them side by side. Our Variations tool creates a new set of photos, with the number depending on how many changes you want, so you can adjust backgrounds per platform rather than per shoot.
- Inspect ears, glasses and hair at full size, then keep the version closest to your real appearance. You can also edit any generated photo to swap outfits, hair or glasses and localize the background if a scene doesn't fit a region.
- Keep the original file, record the tool used and run the disclosure test from the previous section before anything goes live.
Uploaded data is kept private and secured while your photos are edited. Platform guidance for profile images favors subtle corrections, brightness, contrast, saturation and a light vignette, over dramatic effects, and rewards exports sized for each platform rather than one stretched widescreen file (LinkedIn's professional profile picture tips). One set of variations replaces a separate session per channel.
Your checklist before posting: backgrounds chosen for each placement, variations generated, ears checked, glasses checked, hair checked at full size, original kept, disclosure decided.
Do this today: upload your ten to twenty photos, pick your first two backgrounds (a neutral studio wall for LinkedIn and a branded workspace for the company page), and generate the first set. You'll have matched portraits you can compare side by side before your next deadline, instead of one fragile masked file you're afraid to reopen.