Retouching an Image: A Practical Guide for AI Portraits
You've found an AI headshot that almost works. The face looks right, the pose feels natural, and you'd happily use it on LinkedIn, except the jacket is wrong and the background looks pasted in. Starting over would mean sorting through another gallery when you only need a small correction.
Retouching an image should fix that specific problem, not redesign the person. The fastest route is a controlled edit, a comparison against your reference photos, and a clear stopping point. A more polished portrait isn't an improvement if colleagues no longer recognize you.
Retouching Techniques at a Glance
Start with low-risk corrections: tone, color, and temporary blemishes. Skin smoothing is common, but that does not make it necessary. Leave it off unless you can identify a texture problem beyond normal skin texture.
A dim headshot may need only a tonal adjustment. If the portrait is flat and the outfit is unsuitable, correct the tone and change the clothing. Avoid changing the face, hairstyle, and expression when they already fit.
Apply the same correction across a gallery, then inspect each portrait individually. Hair texture, head coverings, glasses, skin tone, and other features affect how an edit reads. When replacing a headshot background, keep the selection edge tight to the hair and shoulders so the subject's outline is not clipped. For a separate example of product-image editing, see BEDHEAD's guide to background removal for bed photos.
Keep the existing expression if it already looks like the person. Change it only when the current expression is the specific problem.
Transforme a sua imagem profissional
Obtenha instantâneos profissionais impressionantes gerados por IA em menos de uma hora. Carregue selfies normais ou fotografias de grupo, escolha entre mais de 100 estilos e nós criaremos centenas de fotografias perfeitas que representam o seu melhor.
What Retouching Means for AI Headshots
You're reviewing your generated headshots before updating a professional profile. One candidate has the right face and posture, but the lighting looks dull. Another has a convincing expression paired with clothing you'd never wear to work. Neither problem calls for rebuilding the entire portrait.
For AI headshots, retouching means refining a generated candidate while retaining the person it represents. Unlike editing pixels from a single camera capture, you're evaluating an image synthesized from personal references. That makes resemblance the first acceptance criterion, not the finishing touch.
At Secta Labs, we retrain a copy of the Stable Diffusion model using your uploaded photos, then generate headshots with that personalized copy. Customers upload 15 photos to establish that reference. Your editing task is to select a strong candidate and correct what prevents you from using it.
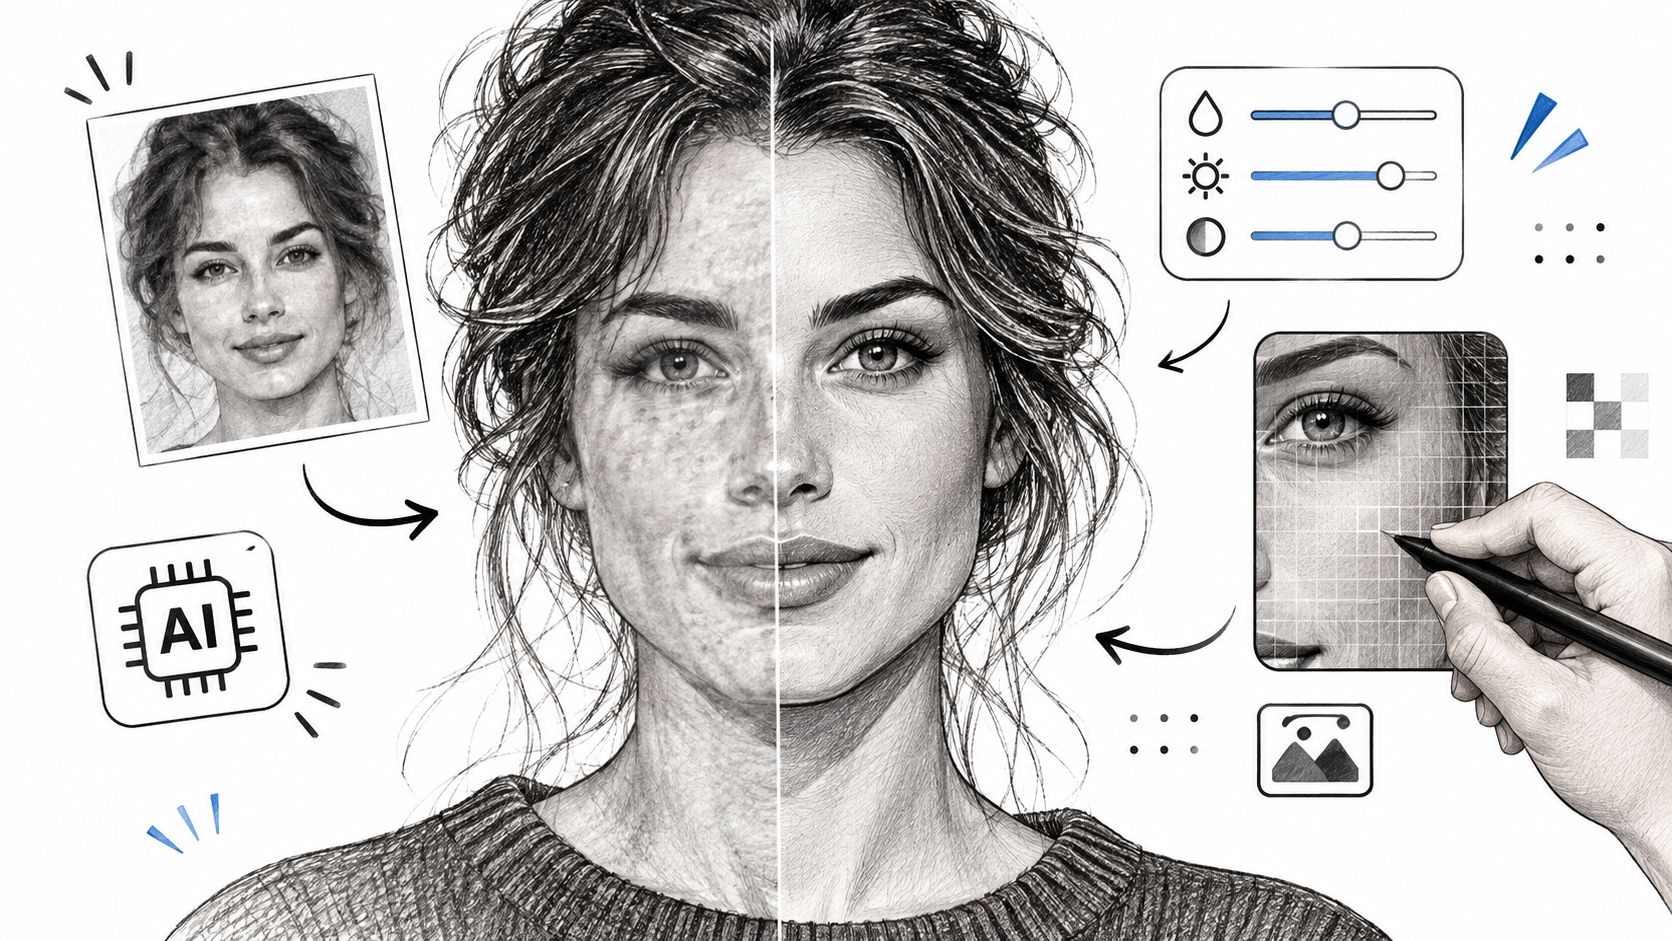
Refine the fit rather than replace the person
Think of a tailor adjusting a suit that already fits. Taking in a sleeve is sensible; cutting an entirely new suit because the cuff needs attention isn't.
- LinkedIn candidate: The face is accurate, but the lighting is flat. Adjust the tonal range and leave the facial details alone.
- Casting candidate: The likeness works, but the outfit misrepresents the role you're submitting for. Change the clothing only if the submission rules permit generated or altered portraits.
- Team candidate: A stray strand crosses the forehead. Remove that strand locally instead of regenerating the person's hair.
This approach reduces the number of decisions you need to make. You're no longer choosing between broadly different versions of yourself, just deciding whether a specific correction worked.
Keep that standard and you can reach an approved image with less rebuilding and fewer rounds of cosmetic experimentation.
Choosing Retouch Scope and Disclosure
Professional doesn't mean younger, thinner, lighter-skinned, or more conventionally attractive. Choose the permitted scope before generating edits, especially when someone else will use the portrait to make a hiring, casting, or identity decision.
Disclosure helps, but it doesn't make every alteration acceptable. In an experiment with 495 participants, a study of AI-generated portraits and disclosure found that disclosure reduced perceived bias for images of college students but not consistently for older people. Transparency isn't a substitute for accurate representation.
Corrective and identity-changing edits
These are editorial recommendations, not permission to bypass submission requirements. If an ID authority requires an unaltered image, don't submit a generated headshot, disclosed or otherwise. Casting platforms and employers may also impose stricter rules.
Set the scope for the destination
For LinkedIn, allow corrective adjustments and localized background or clothing fixes. Keep the unedited candidate and personal references on file so you can check that the finished portrait still represents your current appearance.
For casting, allow localized fixes only when accepted, disclose them, and compare the face with how you'll appear on set. Don't use an expression or hairstyle that creates an expectation you can't match.
For a company directory, require a recognizable match to the employee's badge photo. For a coordinated team gallery, standardize lighting and outfit requirements, not facial proportions or body shapes. Obtain each employee's approval rather than treating a manager's preference as consent.
Our editing options include over 12 tools, including Clothing Change, Change Expression, Change Background, Upscaler and Retouch. Variations can address small errors or explore larger pose, clothing, and background changes. Choose the allowed edit first, then the control, rather than letting the available controls determine the scope.
Protect distinguishing features
Preserve authentic age, skin tone, cultural styling, body type, and visible disability. A head covering isn't background clutter, a hearing aid isn't a blemish, and an older person's facial lines aren't a technical defect.
A study of AI-generated occupational imagery documented underrepresentation of women in senior and technology roles and no people with visible disabilities across its analyzed categories. Don't let a generated portrait introduce a stereotype through standardized styling, erased assistive devices, narrowed features, or lightened skin.
Record major edits and compare the final portrait with the person in ordinary light. Generated Secta pictures can be used for personal and commercial purposes, but usage permission doesn't remove your responsibility to represent someone accurately.
A defined scope makes approval faster because reviewers judge the same criteria instead of debating what “better-looking” means.
Protecting Your Photos While You Edit
A headshot upload involves personal information, not just an image file. The U.S. Federal Trade Commission's biometric policy statement identifies both a person's facial photograph and a derived facial-recognition template as examples of biometric information. Treat the upload and approval process accordingly.
Resolve the data-handling questions
Before generating employee or personal portraits, establish these points:
- Use and protection: What happens to the uploaded material? We keep uploaded data private and secured while photos are edited.
- Retention and deletion: What happens after processing? We delete original images from all storage Secta has access to once they're processed.
- Improvement use: What remains in use, and for what purpose? We use the kept model and uploaded images only to improve the quality of our product.
Confirm the current wording in our published privacy policy before uploading a company batch. Request written clarification of the deletion step and how processing deletion relates to improvement use, rather than assuming those statements answer every retention question.
Make consent part of approval
Say an HR coordinator is preparing an AI headshot gallery from employee selfies. Record each person's consent, restrict access to the source folder, confirm the applicable deletion policy, and note who approved the final portrait. Don't upload an employee's images just because they already appear in a company directory.
Also review what photo metadata contains before collecting reference files. The visible face isn't the only information worth checking.
Clear controls help your team move from references to approved portraits without reopening the same privacy discussion for every upload.
How to Retouch a Portrait in Five Passes
Before editing, establish color-management settings and inspect the generated portrait at 100%, following Adobe's tonal and color-correction guidance. Use adjustment layers or masks wherever your editor supports them, and keep a high-bit-depth master when available.
The practical sequence keeps broad corrections ahead of local repairs.
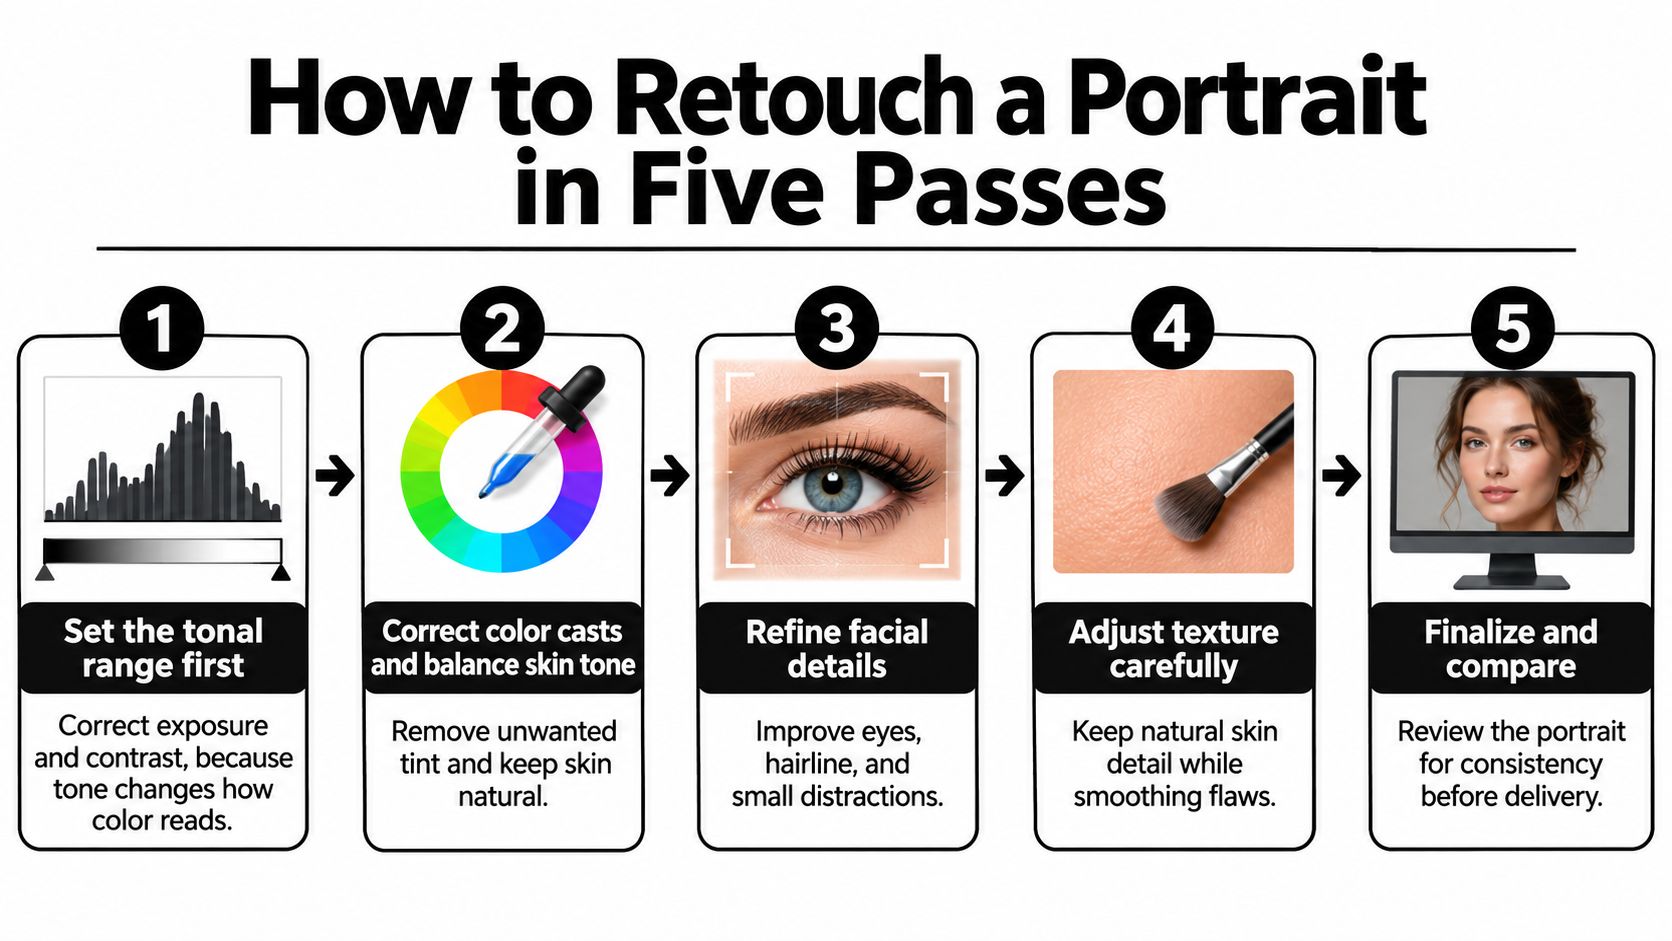
Make broad corrections before local changes
- Set the tonal range first. Correct exposure and contrast because they change how color reads. For an actor's generated headshot with a dim left side, lift the shadow locally instead of brightening the entire face, then decide on the crop.
- Balance color once tone is stable. Remove unwanted casts and match the skin to the person's references. In the actor example, correct any tint in the lifted shadow without forcing both sides of the face to identical brightness.
- Remove defects with healing or localized fill. Clear temporary spots, stray hairs, and distracting background fragments before sharpening can emphasize them. Remove the actor's single forehead strand without repainting the surrounding hairline.
- Apply only the approved generative changes. Replace a background or outfit after the foundational adjustments, protecting the face from unnecessary regeneration. Inspect the new fabric and backdrop against the established light direction.
- Sharpen last and export for the destination. Check fine detail before preparing separate LinkedIn or social, web, and print versions. Don't use aggressive sharpening to disguise an inaccurate eye, invented tooth, or malformed accessory.
Keep output checks separate
Color management translates between creation and output spaces; it doesn't repair poor exposure or incorrect white balance. Display calibration and print soft-proofing remain separate checks, especially when the portrait must work both on a screen and in printed marketing material.
For the actor's final review, compare the corrected candidate with its unedited version and the personal references. The shadow should be easier to read, the strand should be gone, and the person should remain unchanged.
Keep each pass reversible. That lets you remove an unsuccessful correction without discarding the useful ones, which is faster than regenerating a good candidate because the final adjustment went too far. For a straightforward portrait, treat this as a short finishing pass, not an open-ended beauty edit.
Localized Generative Edits That Replace a Reshoot
A wrong backdrop isn't a reason to replace a convincing face. Localized generative editing lets you isolate the mismatch and preserve the rest of the candidate. That's the practical time saving: fewer discarded images and no need to coordinate another session for an outfit or background correction.
In Adobe's documented Generative Fill workflow, you select an area, describe the desired result or leave the prompt blank to fill from surrounding content, then generate variations on a separate generative layer. The original remains available for comparison and reversal.
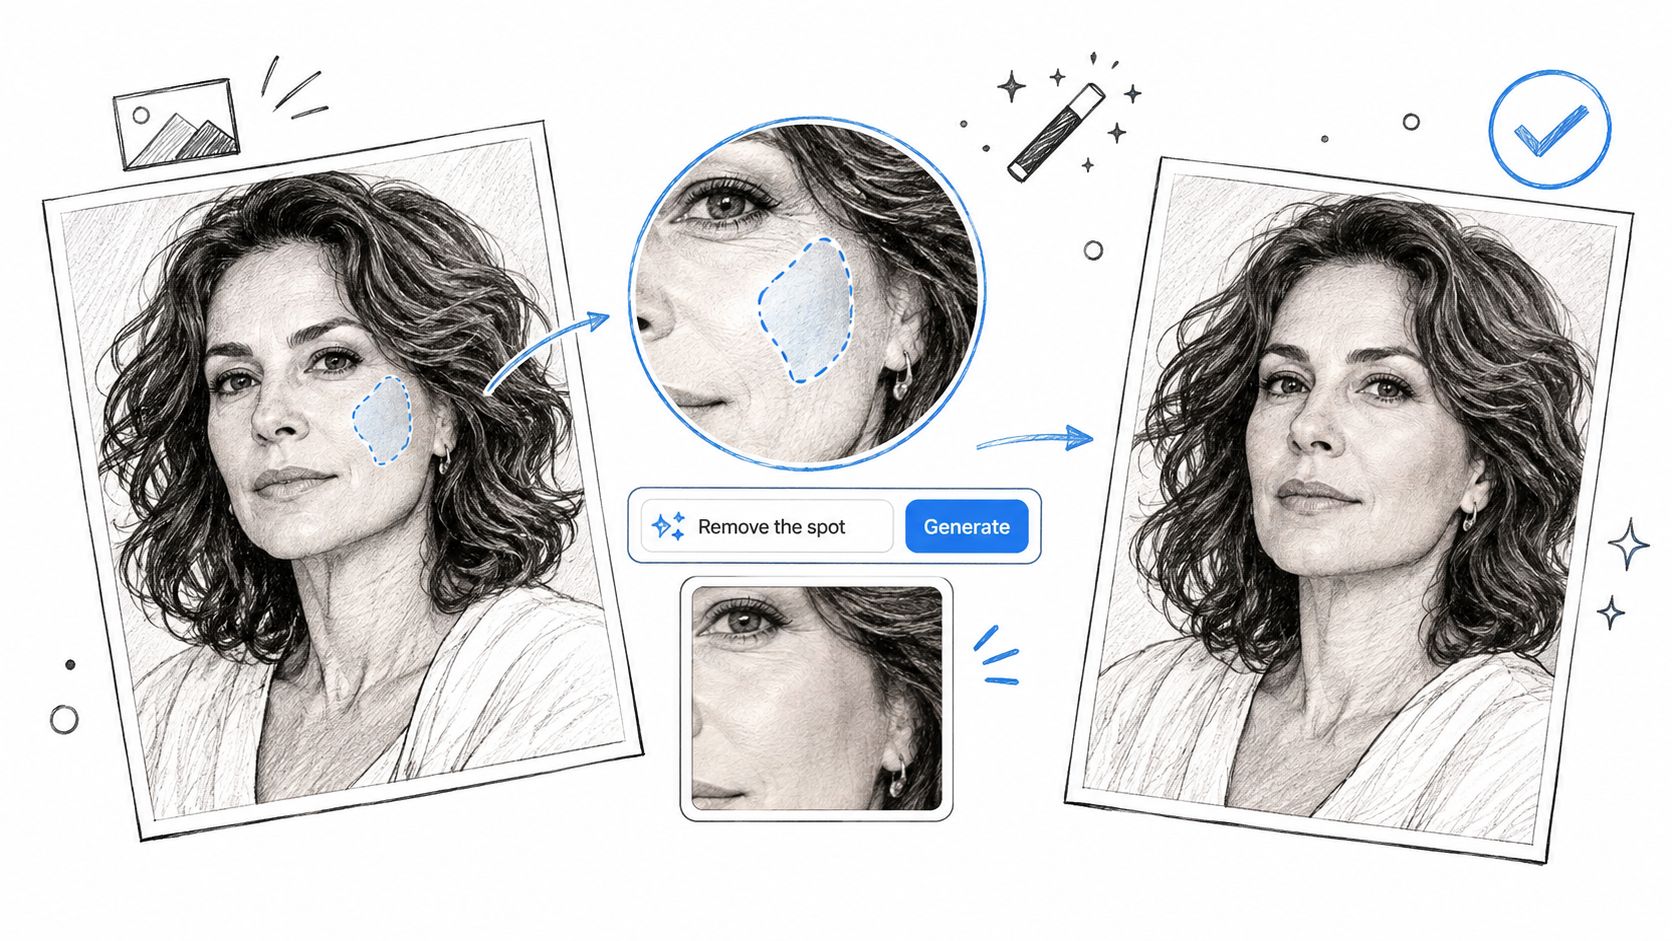
Match the correction to the actual problem
- Busy backdrop to usable office portrait: Select the background and prompt it to replace the background with a neutral office setting. In our workflow, Change Background addresses this task without requiring you to choose an entirely new portrait.
- Distracting object to clean shoulder outline: Select only the object beside the shoulder and request its removal. Keep the selection away from clothing seams and hair wherever possible.
- Casual jacket to business outfit: Request a navy blazer through Clothing Change. Check the collar, lapels, and shoulder shadows before accepting the result.
- Tense face to appropriate expression: Change Expression targets the expression while everything else stays the same. Verify that the eyes and facial structure still match, and reject an expression that feels unfamiliar.
Variations handles small errors and can explore larger pose, clothing, or background changes. Don't request a larger change when a small correction will do.
Compare effort, not just the first result
A replacement session can require scheduling, travel, styling, and another approval queue. A localized edit replaces those logistics with a targeted request and inspection. Repeating the request across a gallery is simpler, but each output still needs approval.
If a background swap leaves a halo around the hair, generate a new variation before committing to painstaking manual masking. If repeated variations damage the outline, keep the stronger original rather than accepting the artifact.
Hair changes deserve more restraint than background changes. Our guide to changing hair color on a photo can help with a deliberate update, but don't use recoloring to invent an appearance the person doesn't currently have.
The shortcut is less unnecessary regeneration, not less scrutiny.
How to Check a Retouch Against the Original
An appealing portrait can still misrepresent the person in it. Judge each retouch by how far it shifts the original, not by visual polish alone. Compare the edited image with the unedited candidate to catch editing drift, then use personal reference photos to check whether the starting image represents the person accurately.
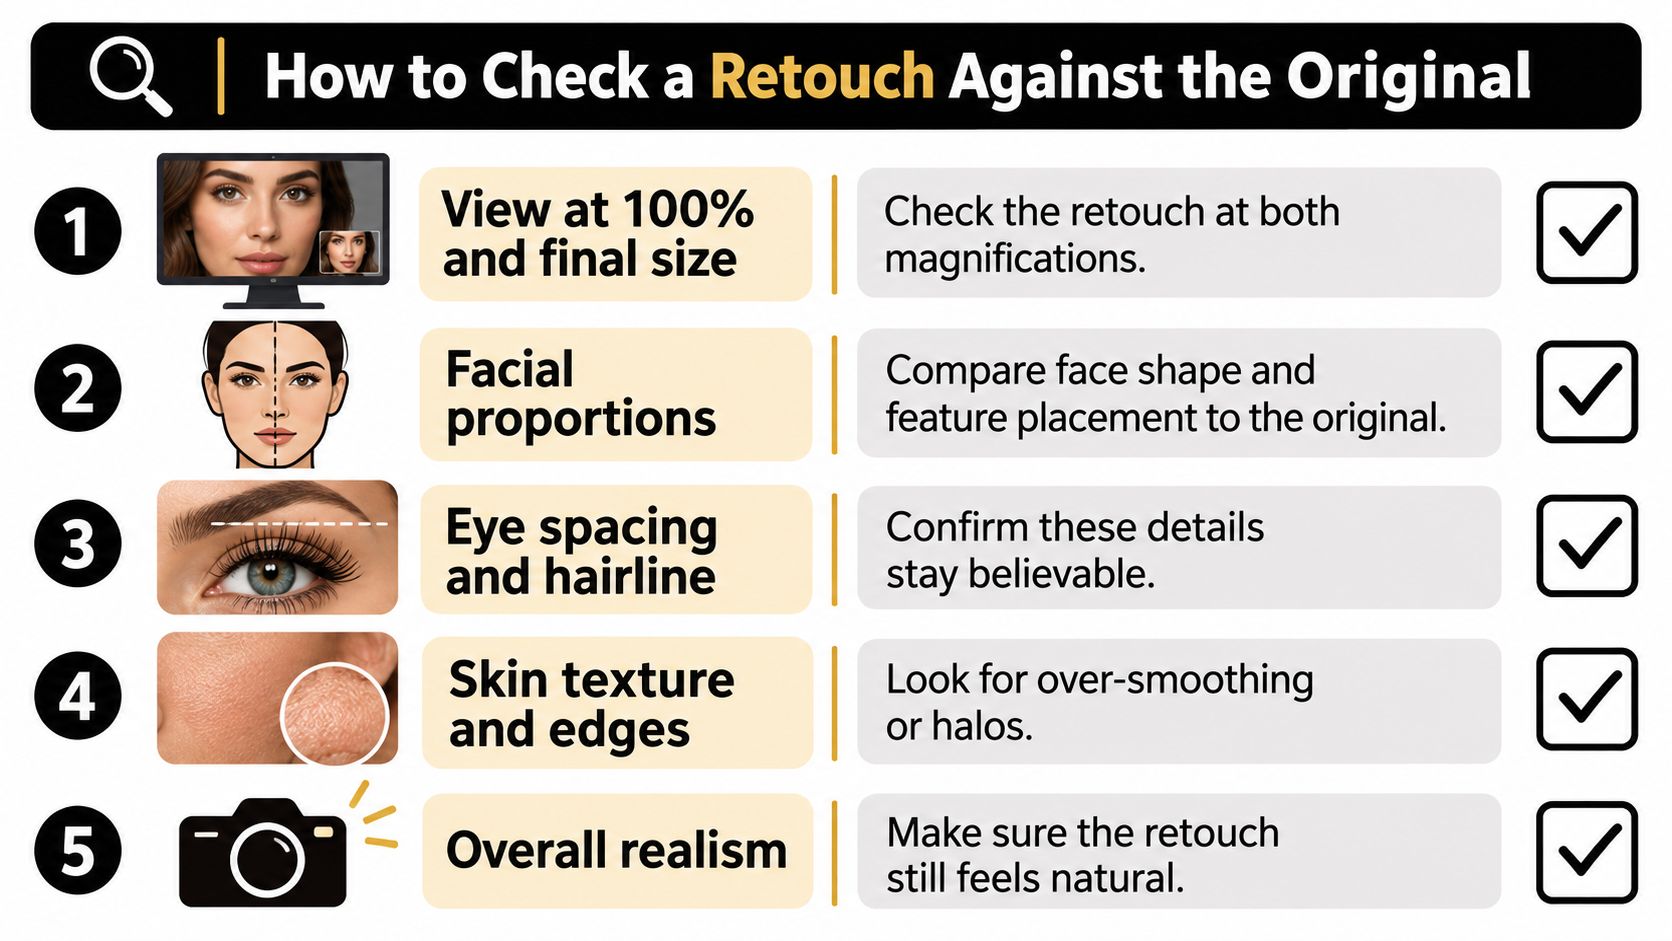
Run a consistent approval check
- Compare magnifications. Inspect both images at full pixel view and at the final delivery size.
- Check identity-bearing features. Compare facial proportions, eye spacing, and hairline with the reference photos.
- Inspect repeated texture. Look for patches that appear copied across hair, skin, or clothing.
- Keep natural skin detail. Reject waxy smoothing and invented texture.
- Follow the light. Make sure the face, hair, clothing, and background share a plausible lighting direction.
- Trace the outline. Check for halos, warped background lines, and damaged accessory edges.
Reject drift before approving the set
Use an internal alteration score from 1 to 5 as a review convention: 1 means minimal correction, and 5 means substantial change. Set a rejection cutoff before reviewing, such as rejecting scores of 4 or higher. The score is your own editing guide, not a research scale.
For example, while comparing ten candidates for one employee across three lighting setups, you notice that an expression edit widens the jaw in one image. Reject it, even if the smile looks appealing. Side-by-side comparison makes changes to identity easier to spot.
Check quality across skin tones, ages, body types, cultural styling, and visible disabilities. Do not assume a retouch preserves identity equally well for everyone. Build this review into your portrait quality-assurance process.
Approve the portrait that represents the person accurately, then stop editing. Use the checklist before selecting a final image.